Proposal Submission For EMR
Click on the option Proposal Submission to see the submenu, as shown in Figure 3.1. The options available are:

Figure 3.1
Note: It is mandatory to fill in the "Mandatory Information " form in "User Profile" menu before filling "Form Submission" section of "Proposal Submission". If your profile is filled the dashboard will display that "your profile is ready for proposal submission".
Form Submission
Different details of proposal are to be filled in the format presented. Click on the Form Submission submenu (highlighted),as shown in Figure 3.2.

Figure 3.2
After selecting the submenu Form Submission from the menu, the form will appear, as shown in Figure 3.3. Select the scheme under which you want to submit the proposal.

Figure 3.3
On selecting the required scheme, the page will appear as shown in Figure 3.4. Click on the button Start Proposal Submission" to go to Proposal Submission Form.
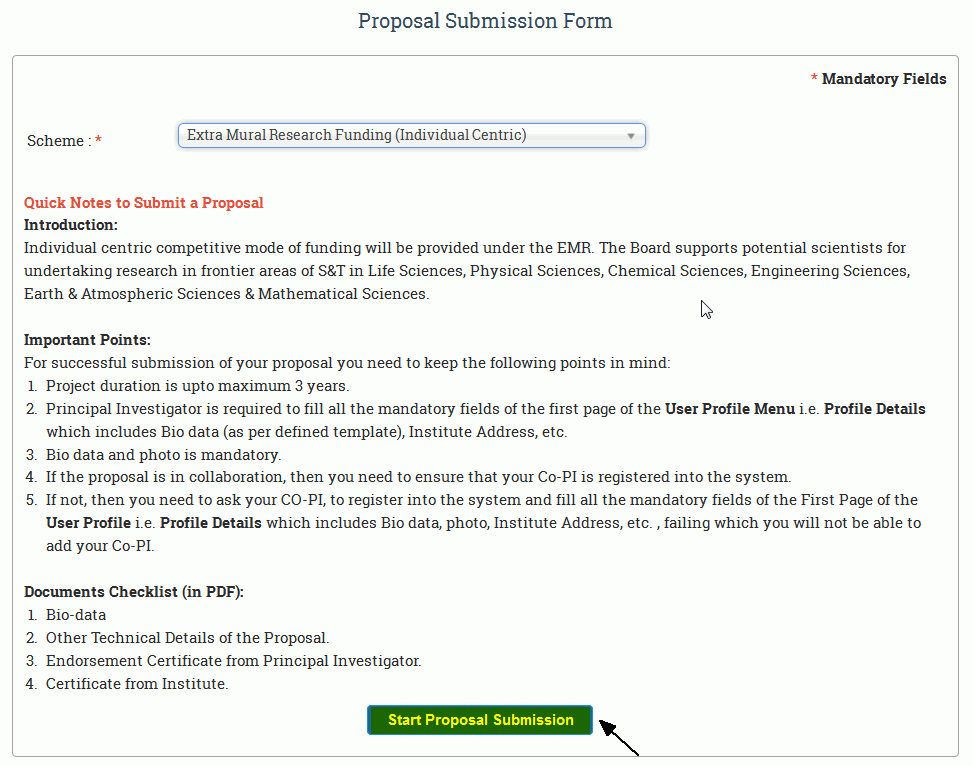
Figure 3.4
After clicking the button, the application form as shown in Figure 3.5 appears.
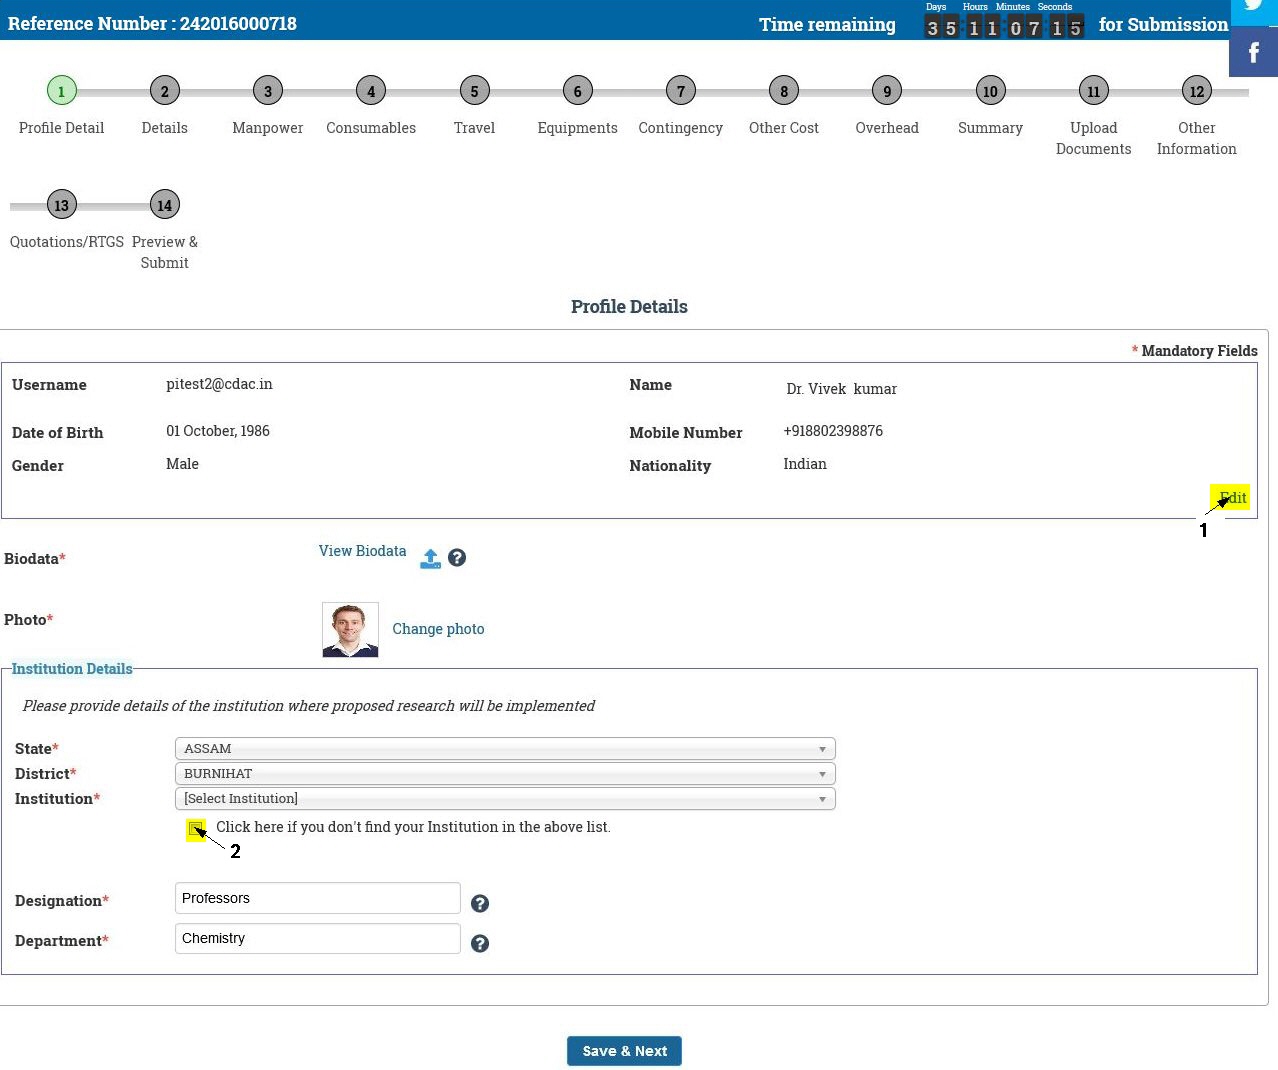
Figure 3.5
Select option in the details of the proposal in the form.
1. if you want to Edit Profile details Click Highlighted yellow Part .
2. Select Check box if you don't find your Institution in the above list.
After Edit and Select Check box in proposal details,the Proposal Submission Form looks like as shown in Figure 3.6.
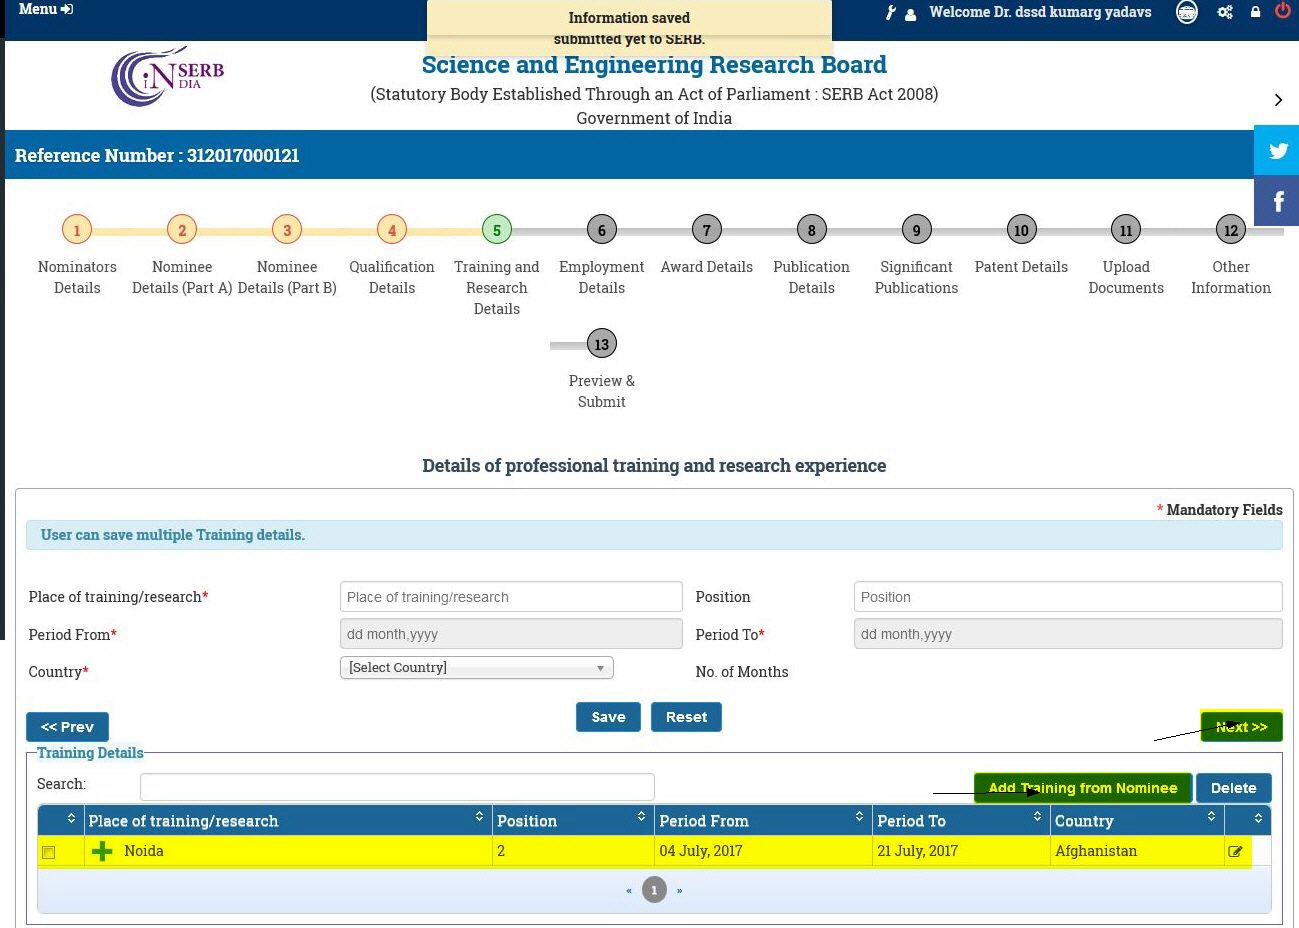
Figure 3.6.
Save & Next : After filling all the details click on this to save the proposal as draft.
After Save & Next Button proposal details,the Proposal Submission Form looks like as shown in Figure 3.7
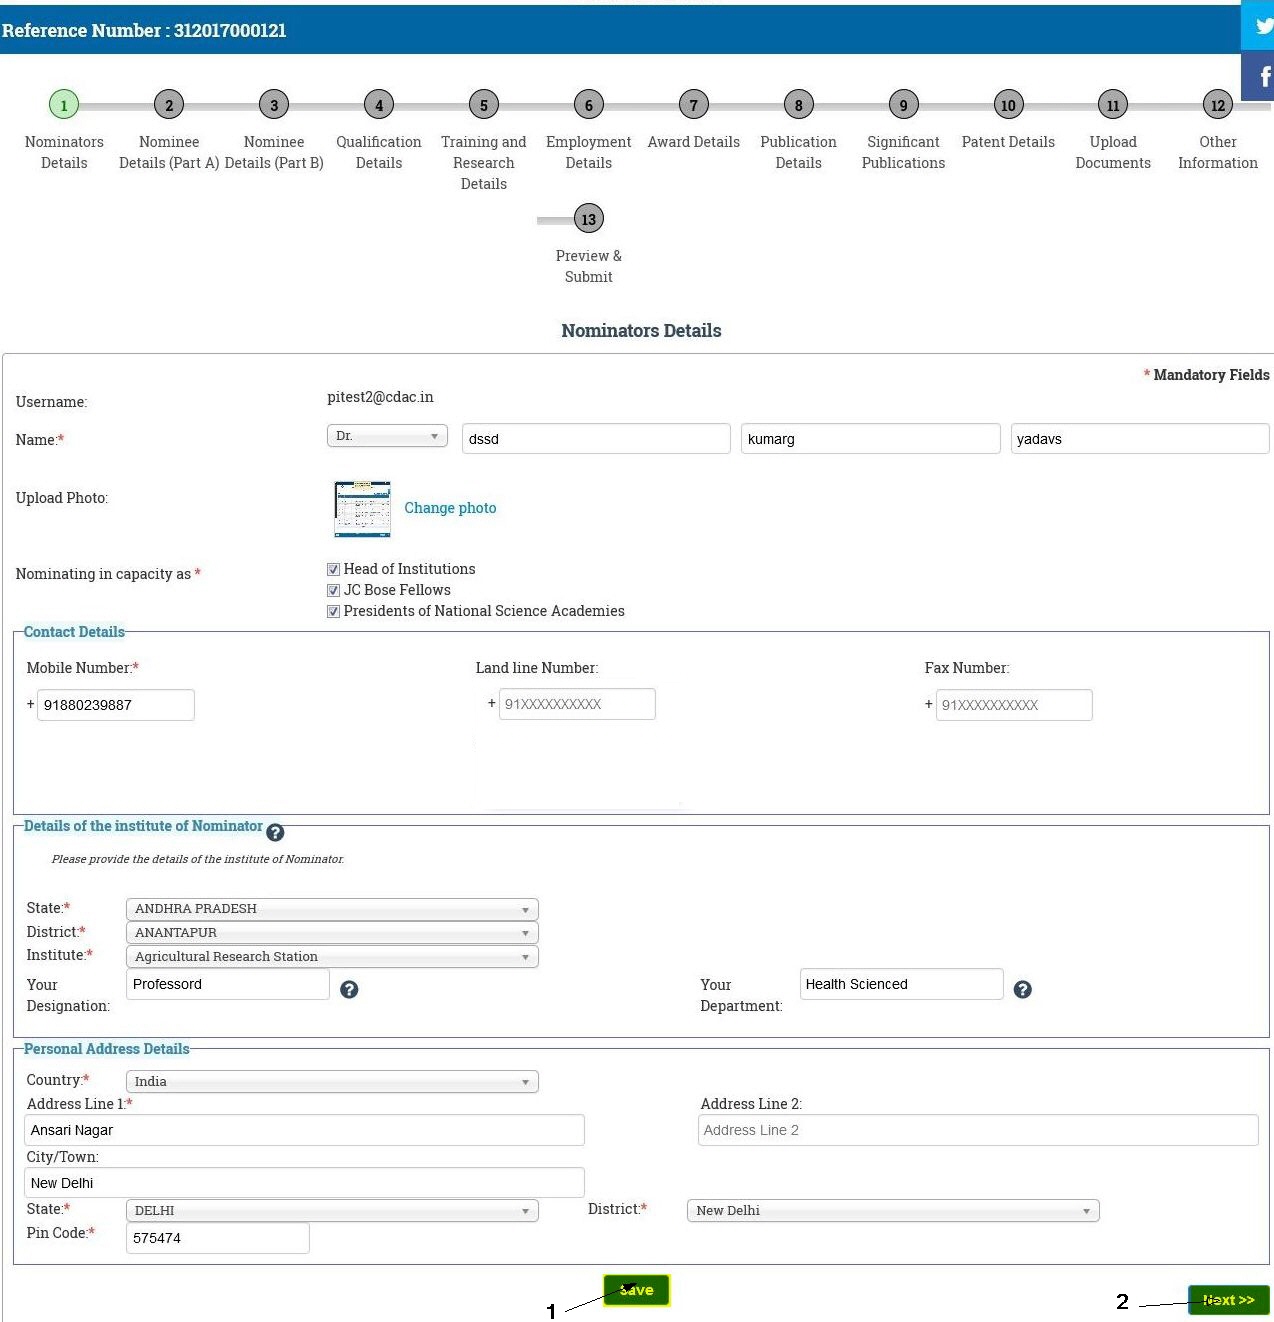
Figure 3.7
Fill in the details of the proposal in the form.
1. if you have any CO-PI in your proposal.
2. if CO-PI belongs to your own institution.
3. To add CO-PI from different institution. Search the CO-PI by using his/her registered em ail address.
NOTE : Fields marked with red asterisk(*) are mandatory.
After filling all the proposal details,the Proposal Submission Form looks like as shown in Figure 3.8.
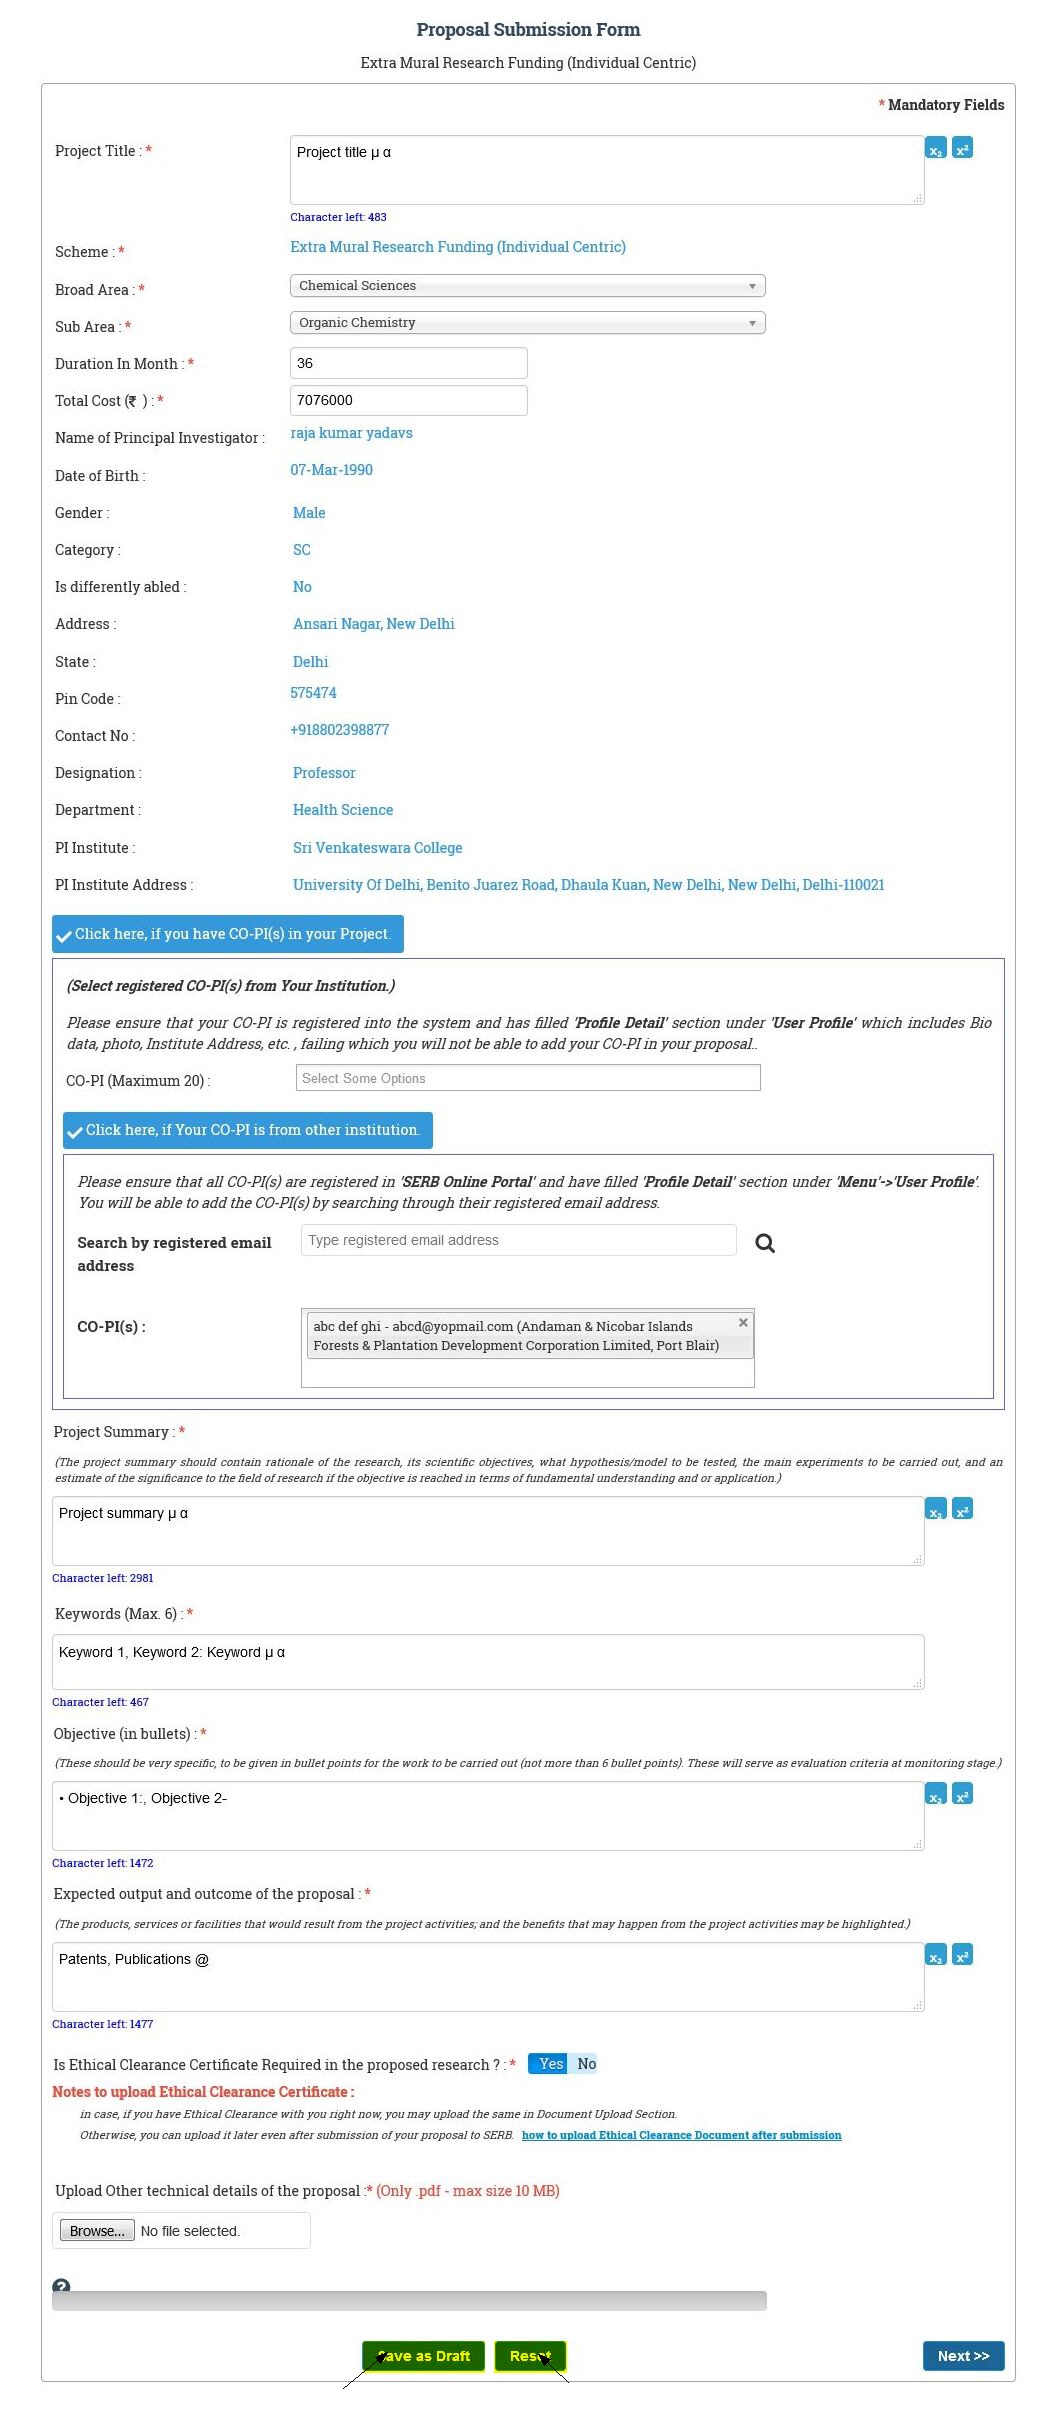
Figure 3.8
The fields in Figure 3.6 are defined as follows:
-
Save as Draft : After filling all the details click on this to save the proposal as draft.
-
Reset : This button is used to reset the whole form to blank.
After Save as Draft, a message will be displayed with the reference number generated for your proposal. The page will appear as shown in Figure 3.9. Click on the Next button (highlighted), to fill in the other details asked for proposal submission.

Figure 3.9
Budget for Manpower:
The budget for salary is filled with the details of the participating assistant and co-worker in the proposed research. They have different roles in the project. The Form will appear, as shown in Figure 3.10.
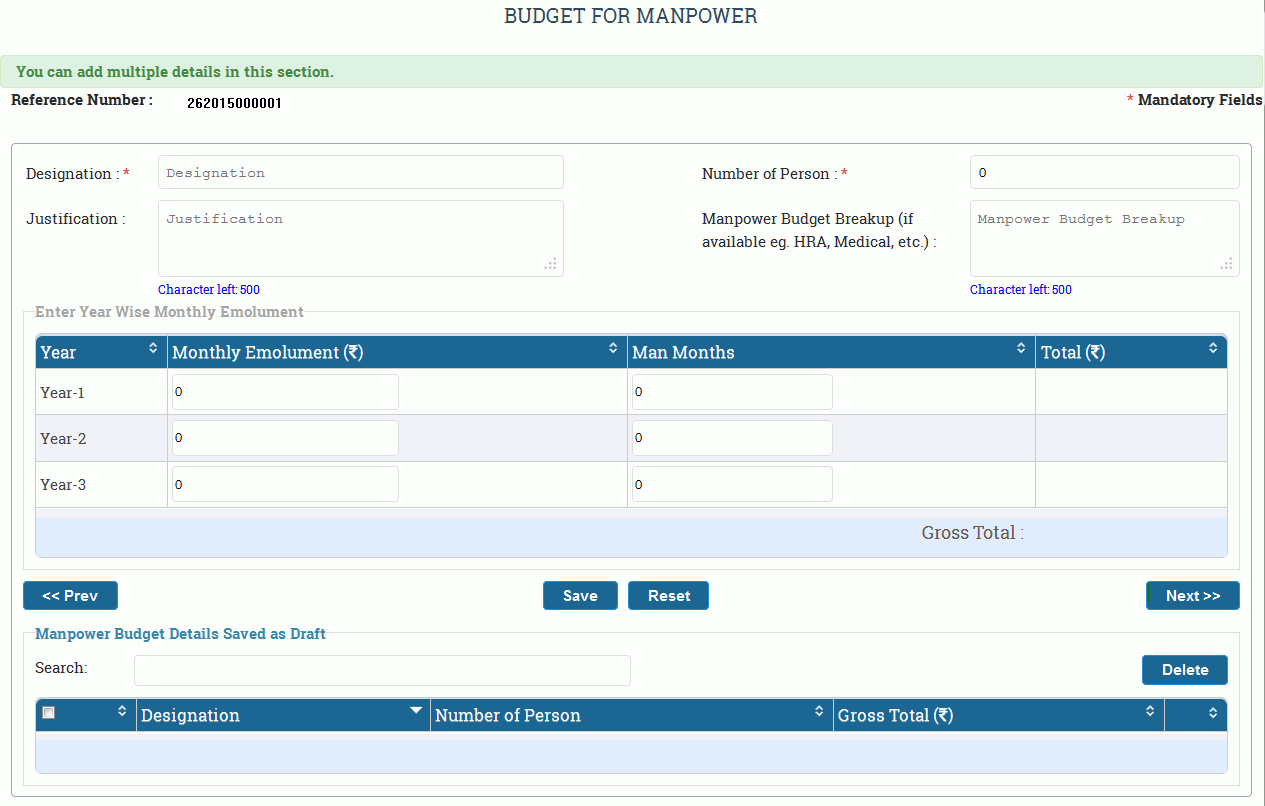
Figure 3.10
Fill in the details in the Budget for Manpower and click on Save button, as shown in Figure 3.11.
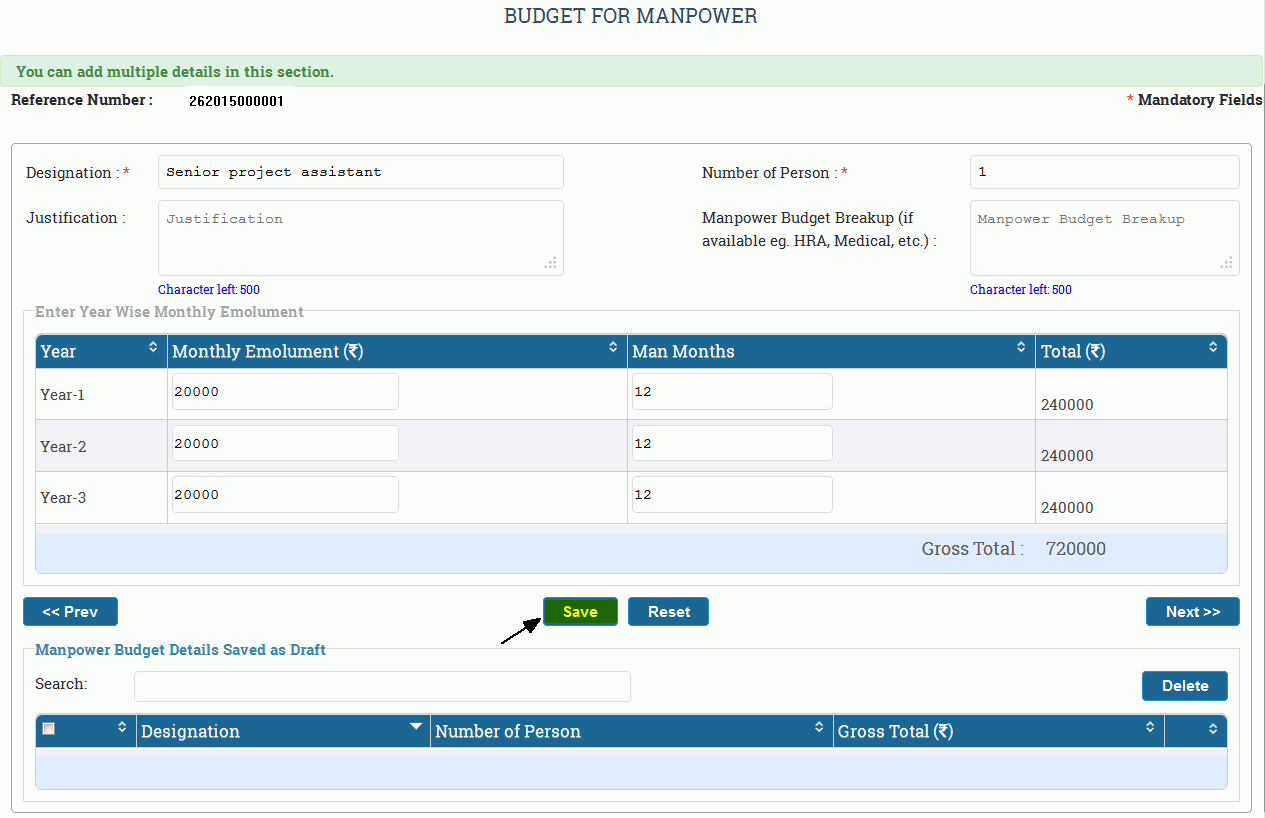
Figure 3.11
After clicking Save button, you can see that the details has been added to the list in the table under heading Manpower Budget Details Saved as Draft, as shown in Figure 3.12.
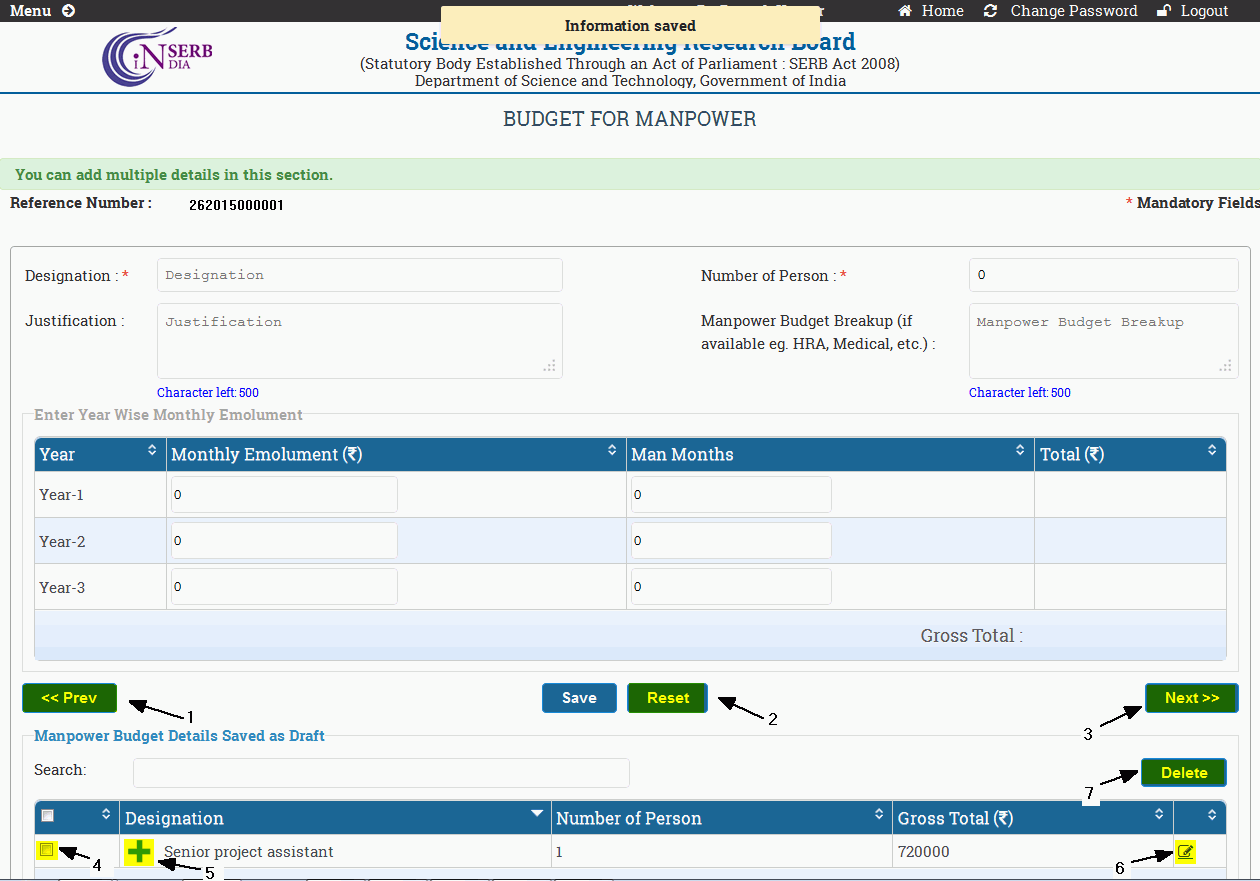
Figure 3.12
Figure 3.10 shows the different functions/operation provided. They are:
-
Prev : This button will take you to previous form.
-
Reset : This button resets all the fields of the form to default value.
-
Next : This is used to navigate to next page after filling in all the details in the form.
-
Checkbox : This checkbox is used to mark/select different entries which you want to delete.
-
Plus Sign : On click, this displays the details not displayed in the table.
-
Edit Button : This symbol is for editing the details which are already added to the table. As you click on edit button , all the details will appear in different fields. Edit them as required and then click on the Update button.
-
Delete : The button is used to delete any entry from the table. Select the respective checkbox of the entry to be deleted and then click on the delete button. You can delete multiple entries at a time.
Budget for Consumable Material:
You need to fill the details of extra consumable materials required like paper, laboratory equipment, etc with the details of their cost in consecutive years. When you click on the Next button in Budget for Manpower, the "Budget for Consumable Material" form will appear,as shown in Figure 3.13.

Figure 3.13
Fill in the details asked in the form. "Justification" is a field in which you have to give justification for different material needed. The fill in form will appear as shown in Figure 3.14. Click on the Save button (highlighted), shown below to submit or add the details to the table.
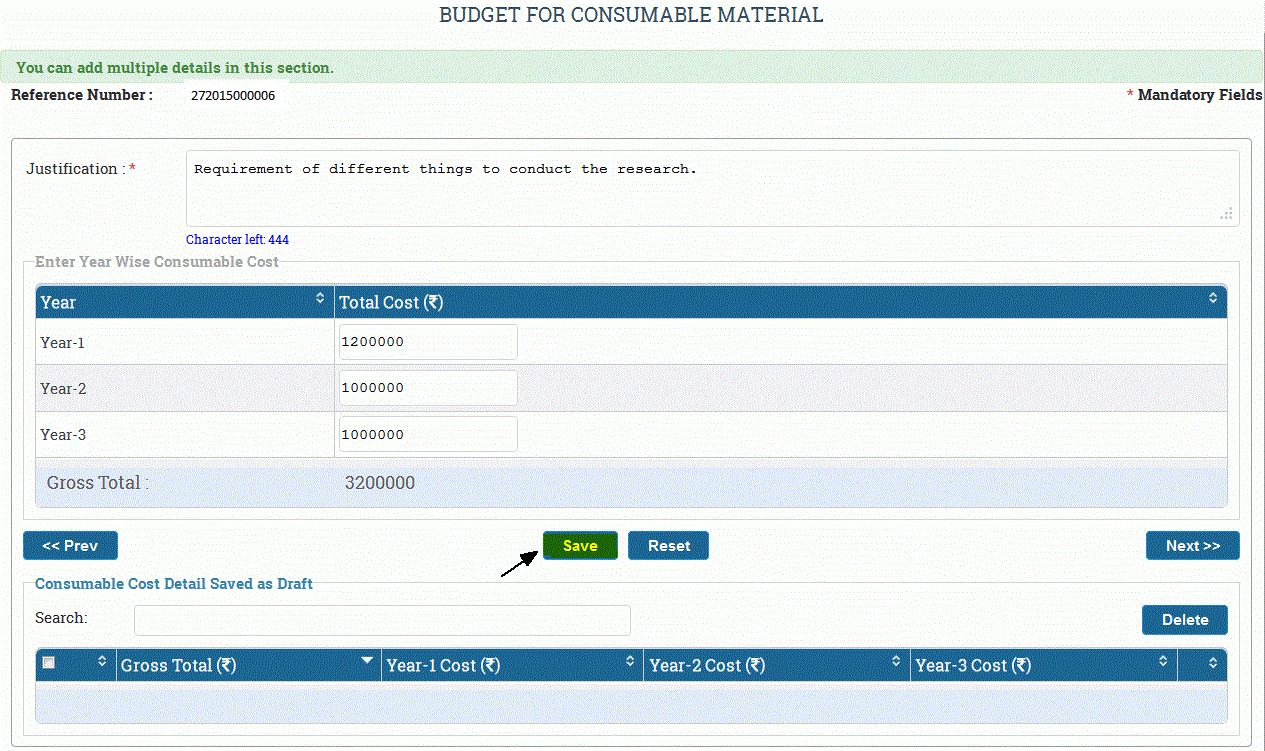
Figure 3.14
After saving the values a message will be displayed, as shown in Figure 3.15.
In case, you want to edit the details or delete the details, follow the procedure explained in Budget for Manpower. Click on Next button (highlighted) to go to the next page.
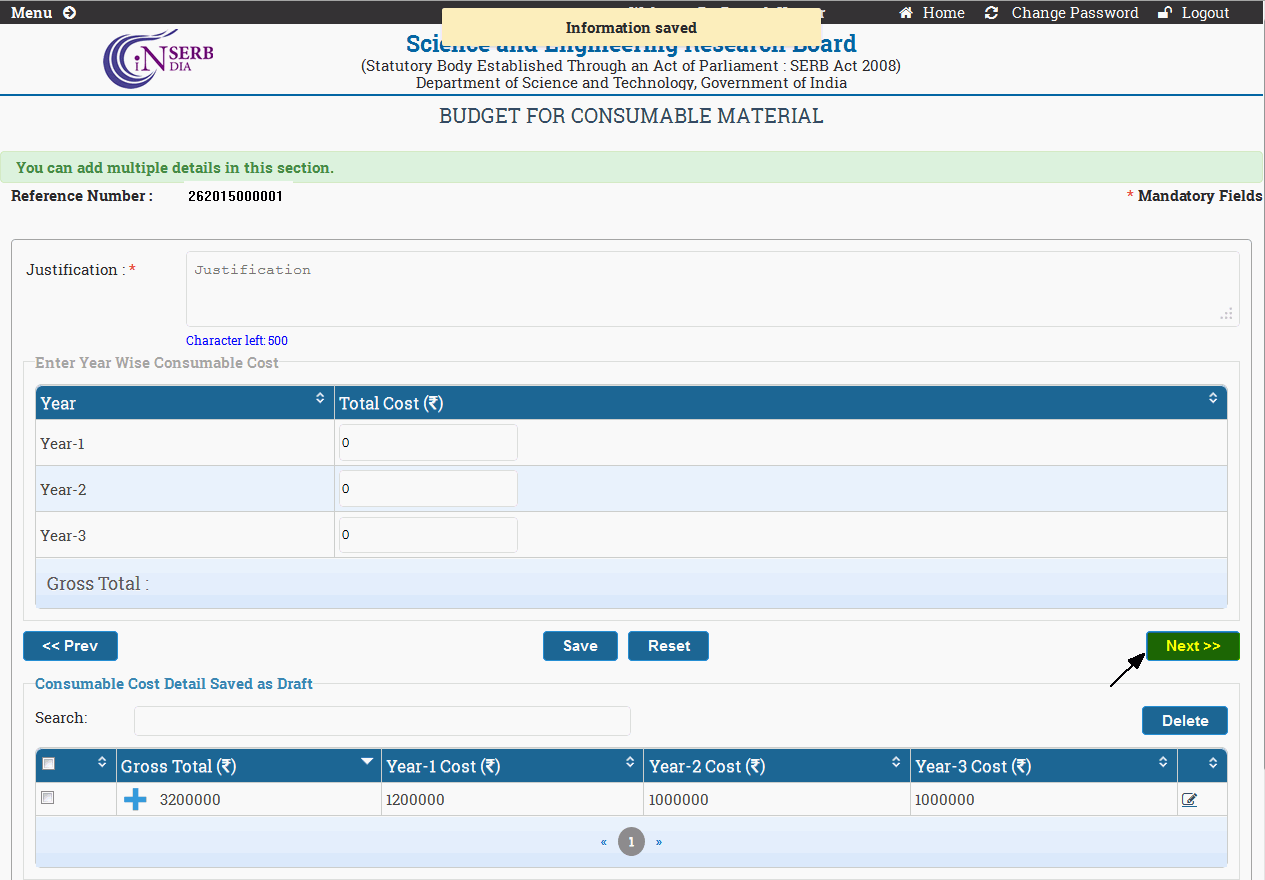
Figure 3.15
Budget for Travel :
In this form you have to fill in the details of the travel you are expecting, the yearly expenditure and the purpose of travel. Fill in the budget expected for all travels to be done throughout the research. The Next button in the "Budget for Consumable Material" will lead to "Budget for travel" form, as shown in Figure 3.16.
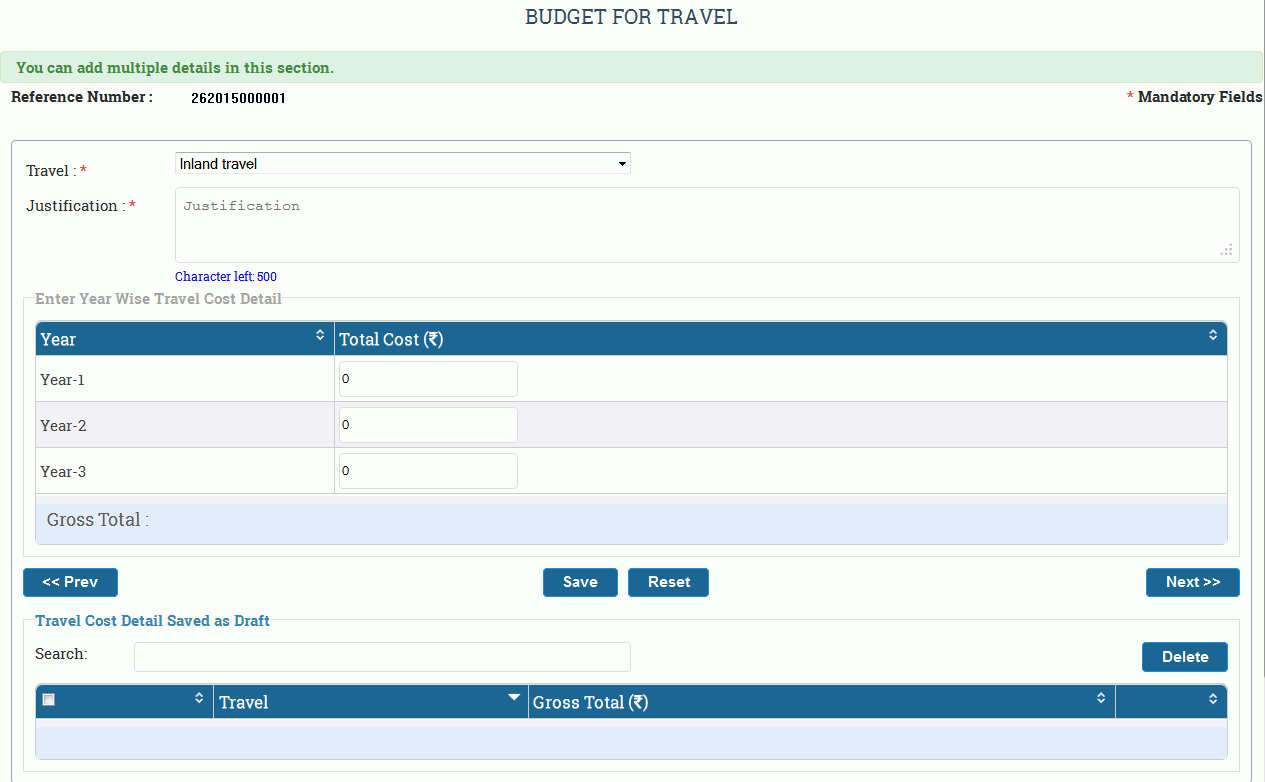
Figure 3.16
Fill in the details asked in the form, as shown below in Figure 3.17and then click on Save button (highlighted) to submit the details.
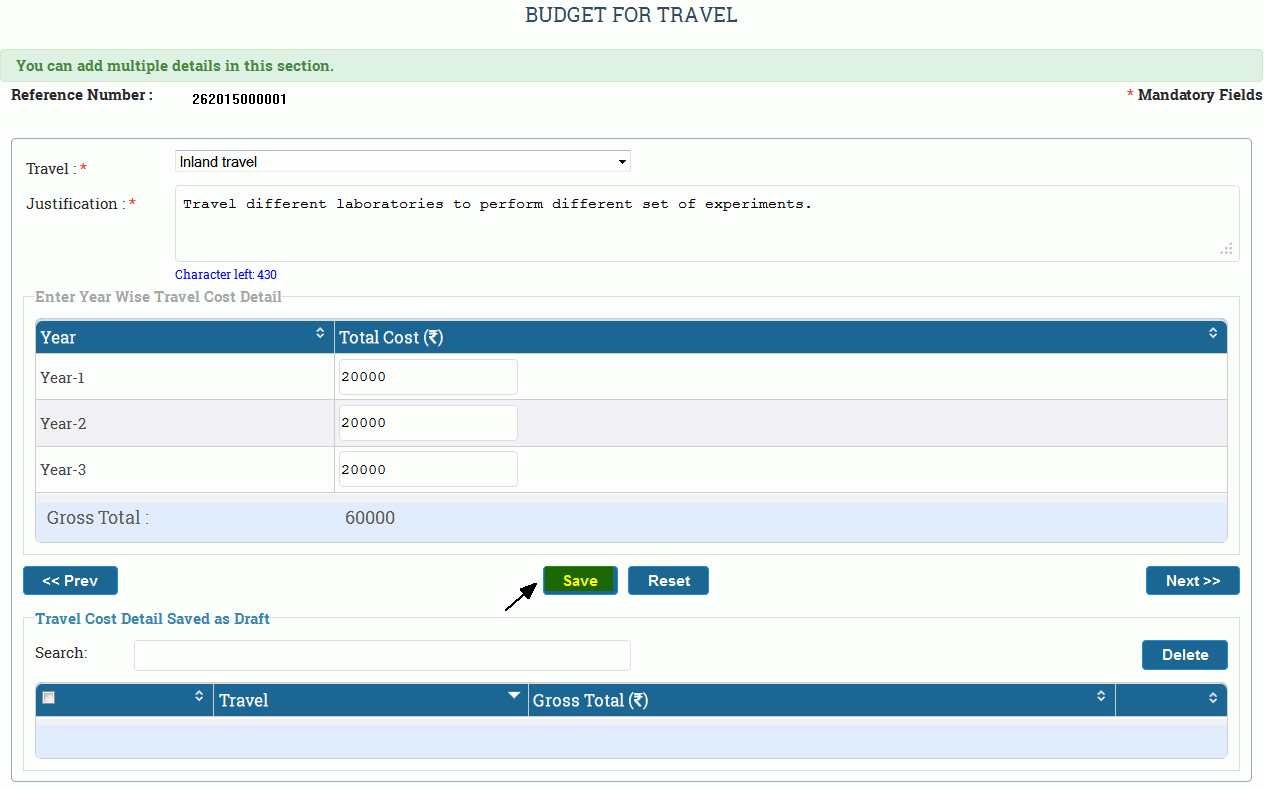
Figure 3.17
The details will appear in the table. You can Edit and Delete the added details as explained before. The new details can be added by entering new values and then saving them, they will also appear in the table, as shown in Figure 3.18
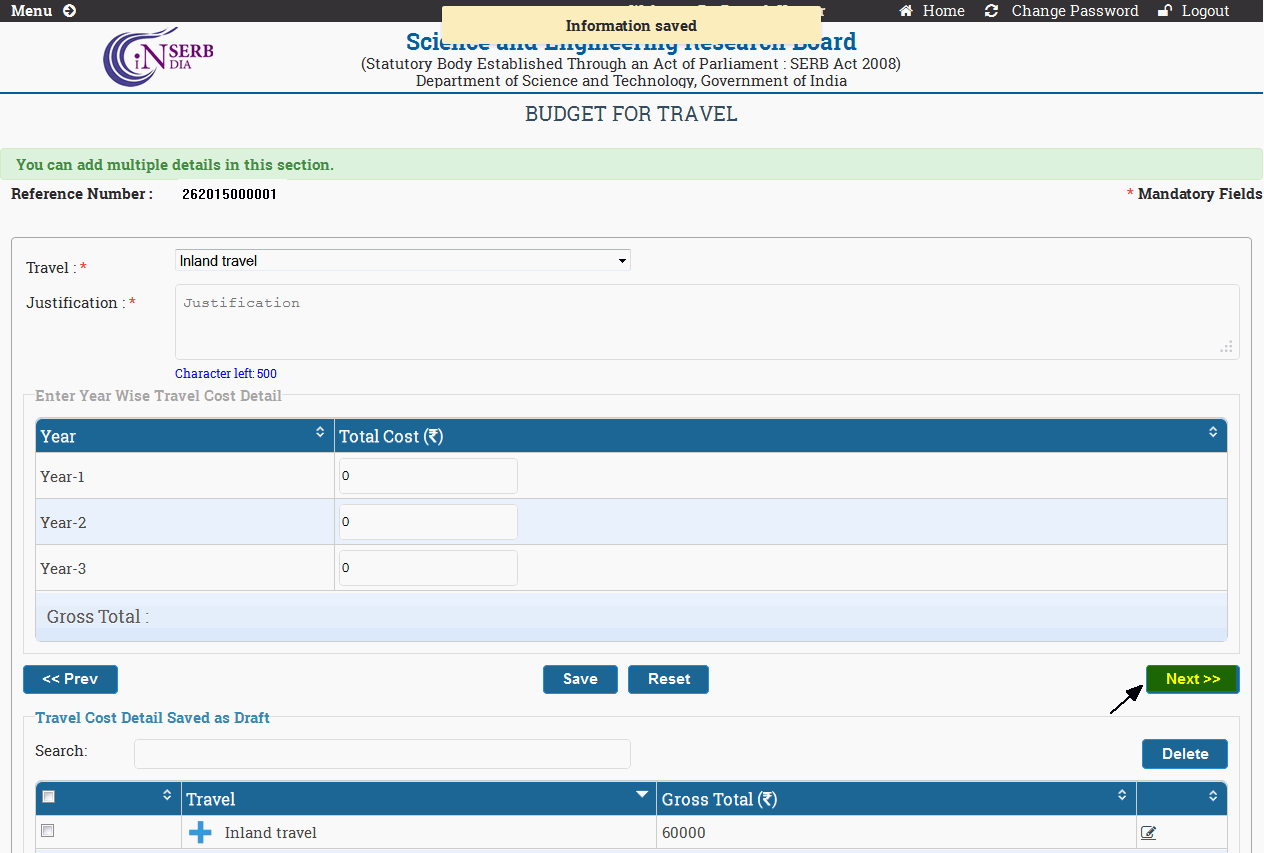
Figure 3.18
Budget For Equipment :
This form includes the details of the different research equipment to be purchased for research. The Next button of "Budget For Travel" will lead to "Budget For Equipment" form. The form will appear as shown in Figure 3.19.
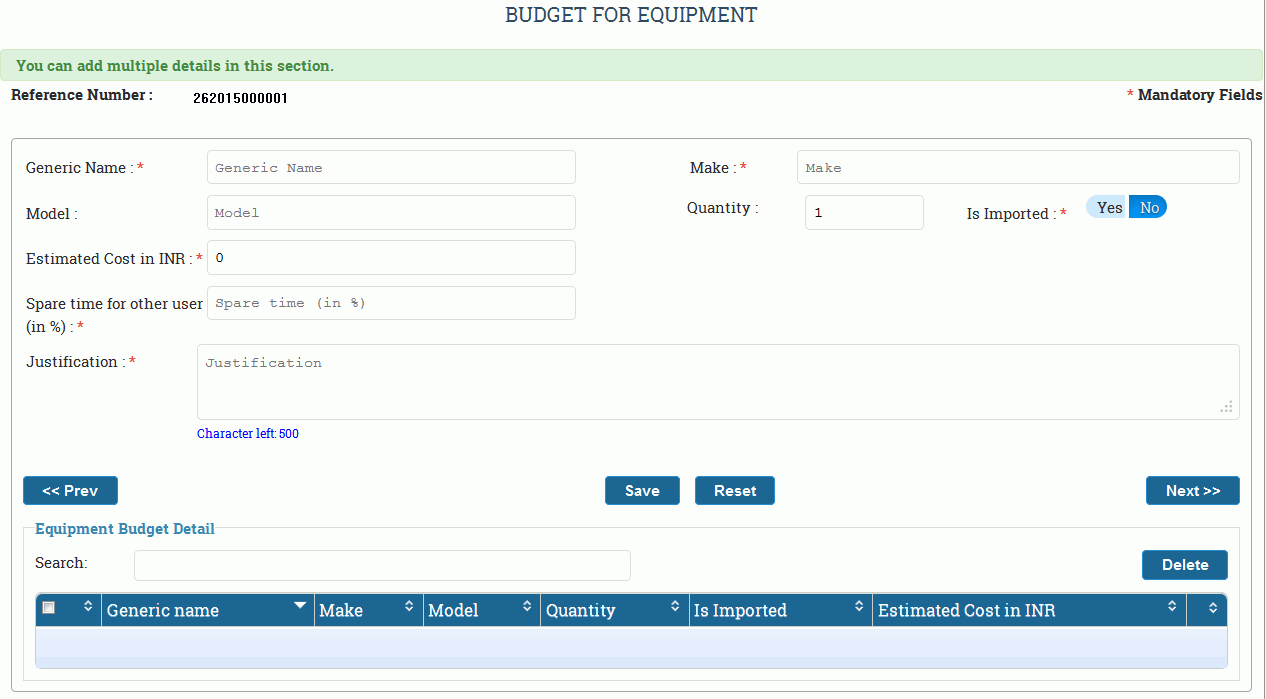
Figure 3.19
Fill in the details asked in the form about the equipment and click on the Save button (highlighted) to add it to the table, as shown in Figure 3.20.
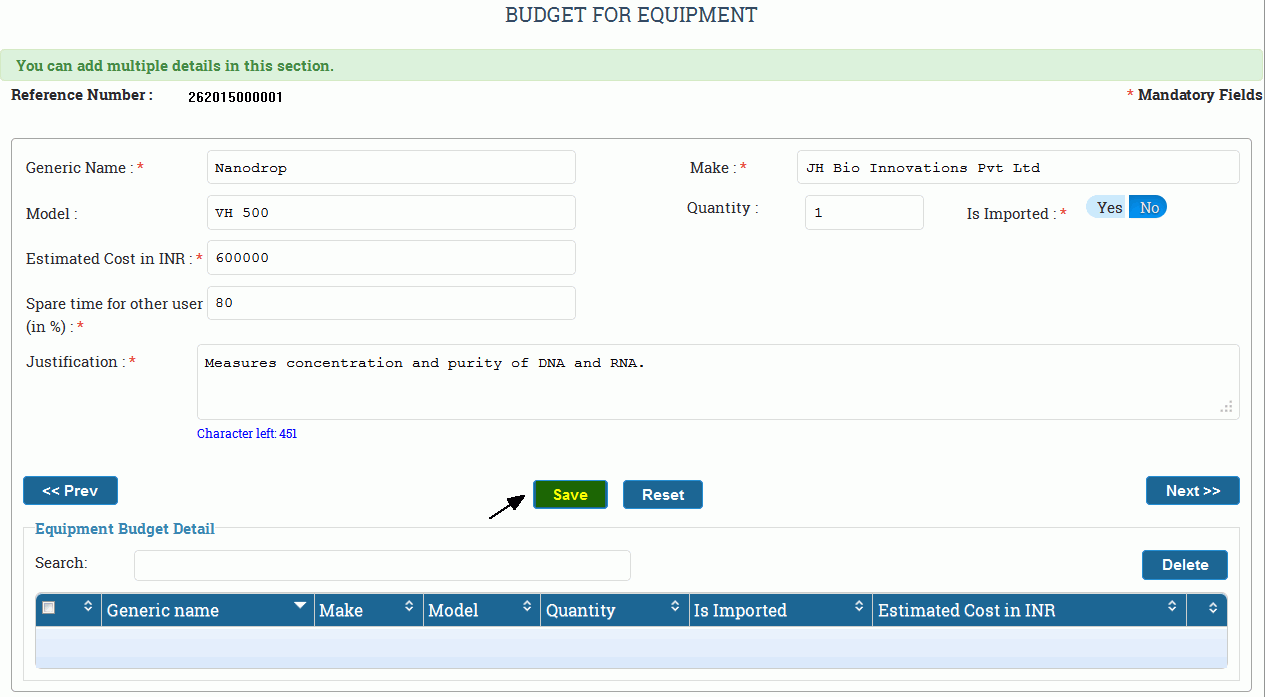
Figure 3.20
After Save the page will appear as shown in Figure 3.21.
You can edit or delete the entries, as explained before. To add the other details , fill in the form again and click on the Save button, the details will appear in the table.
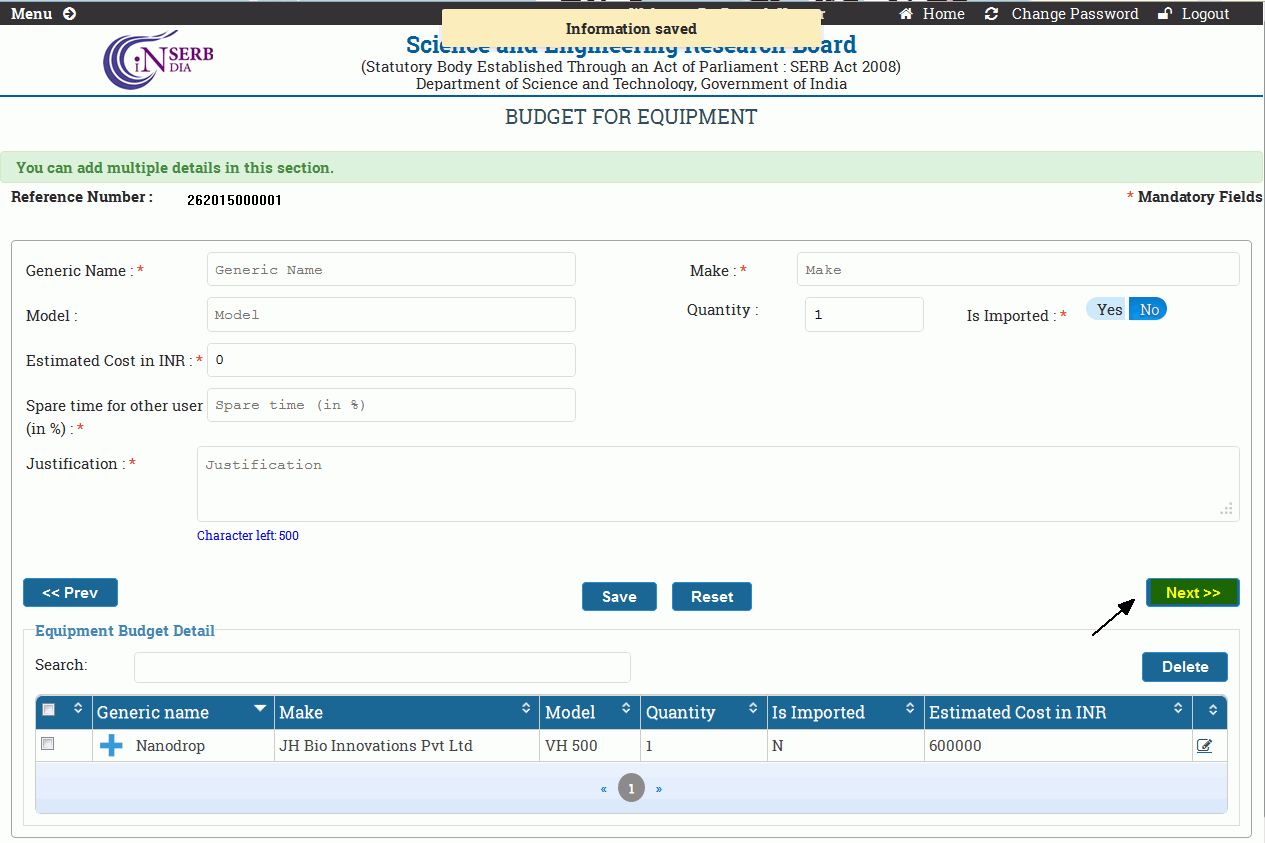
Figure 3.21
Budget For Contingency:
This form includes the Budget for different events to be organized during the period of research. Provide the expected details and funds for the events to be organized throughout the years. The Next button of "Budget for Equipment" will lead to "Budget For Contingency" form, as shown in Figure 3.22.
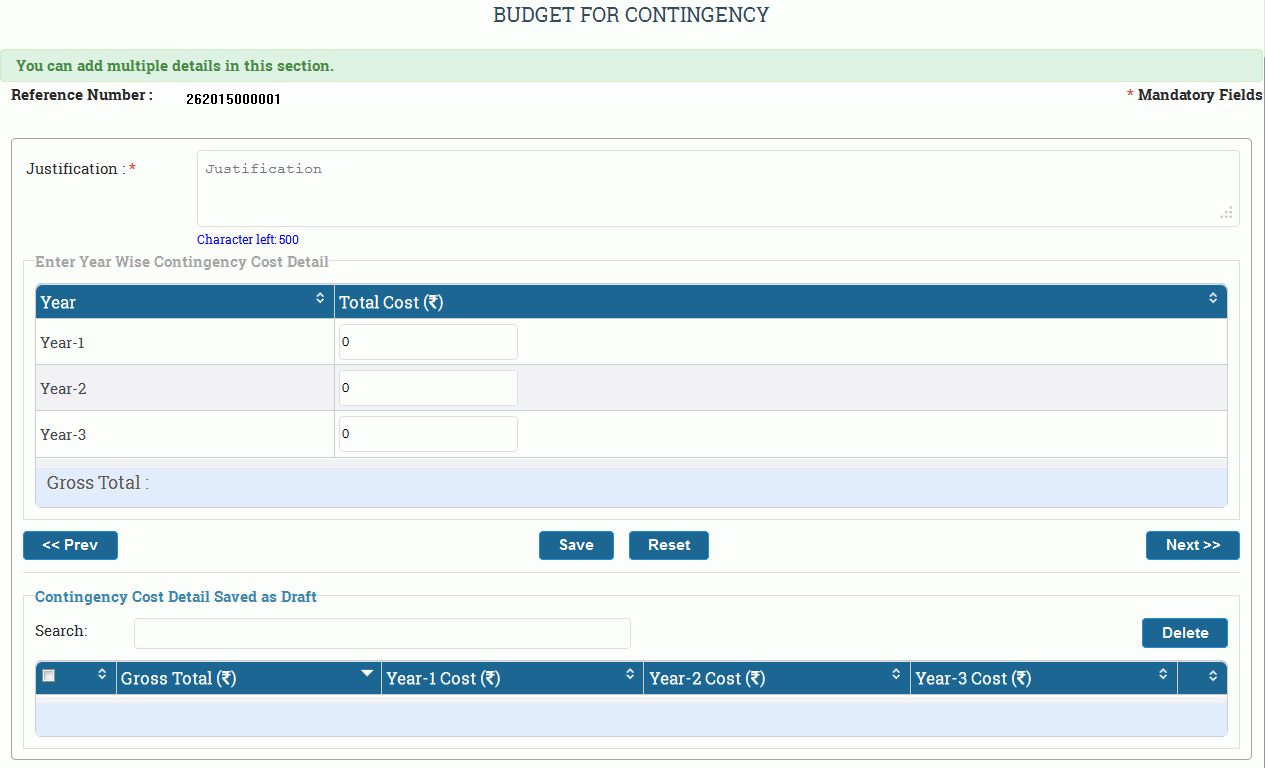
Figure 3.22
Fill in the details asked in the form and click on the Save button (highlighted), to add it to the table. As shown in Figure 3.23.
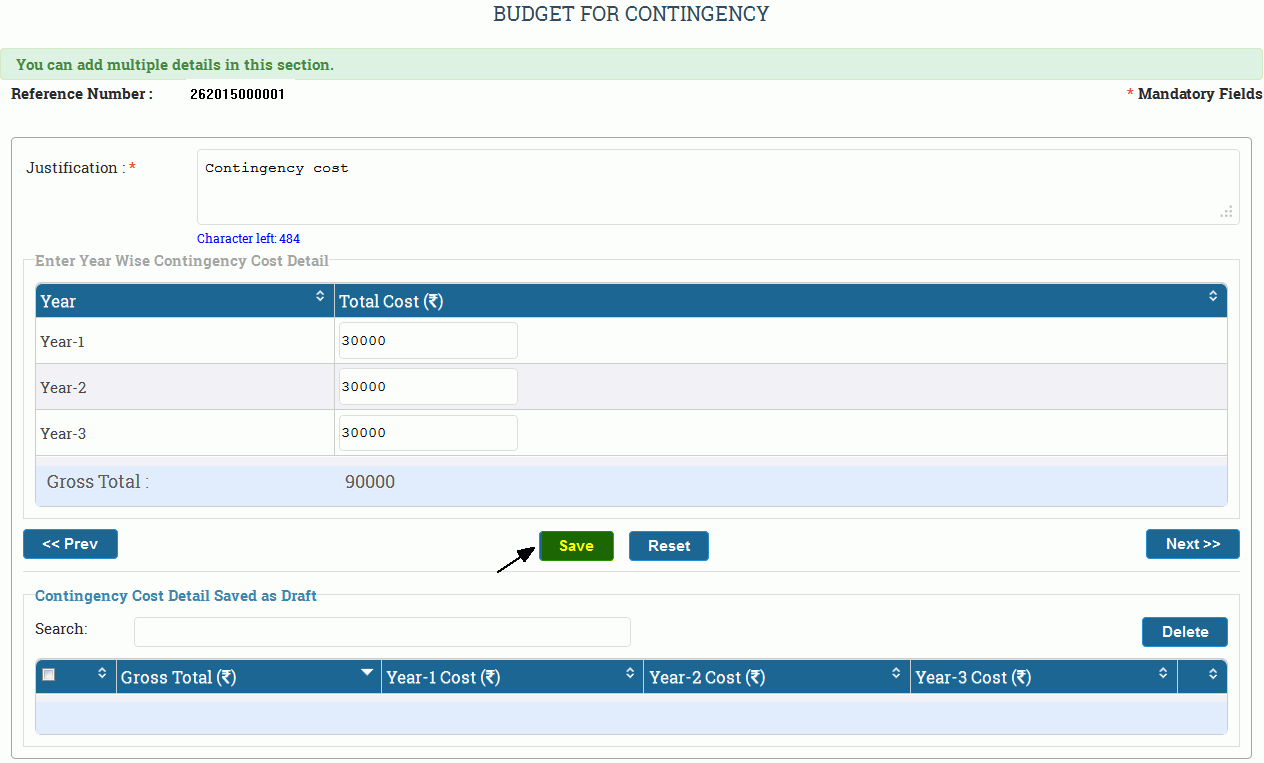
Figure 3.23
After Save, the page will appear as shown in Figure 3.24. You can add,edit or delete the details, if required as explained before. Click on Next button (highlighted) to go to next page.
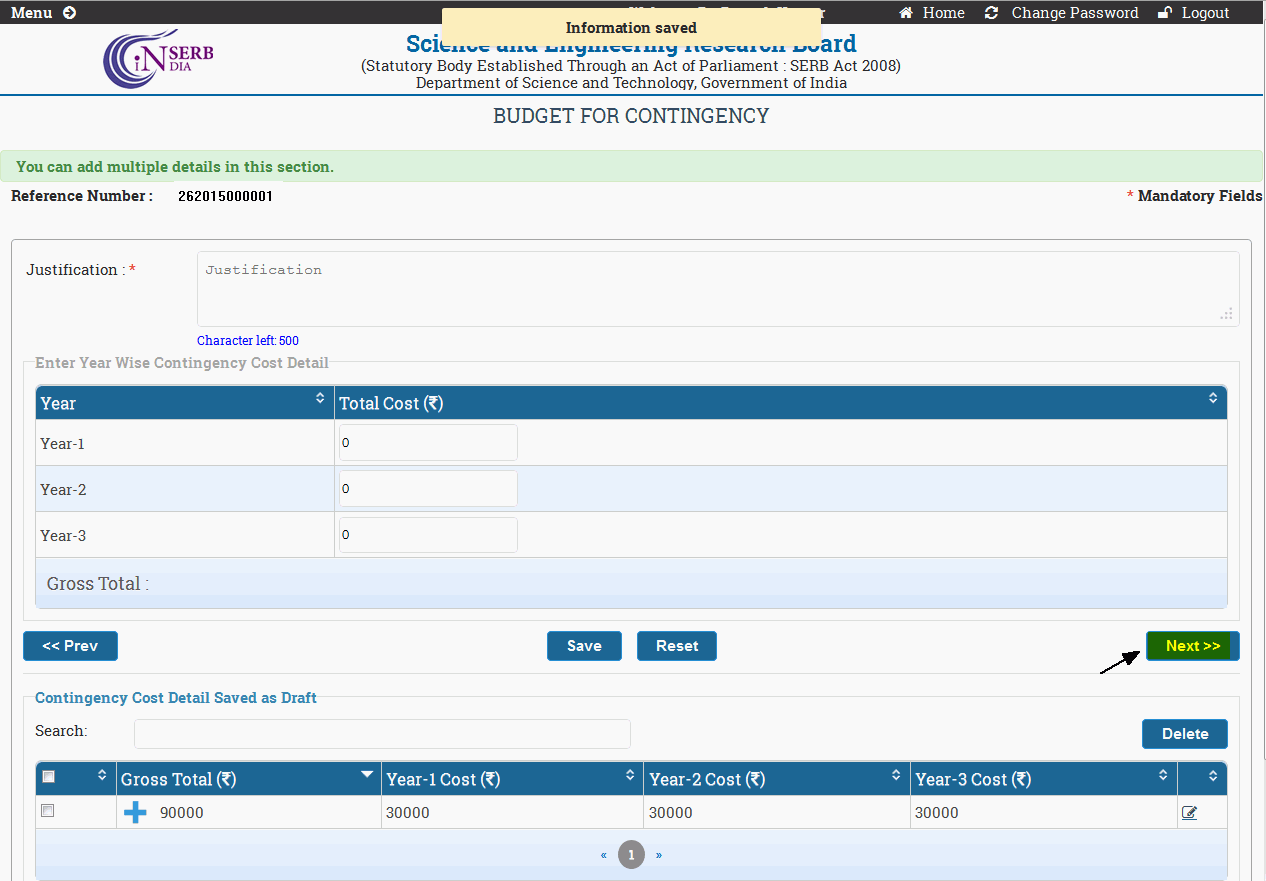
Figure 3.24
Budget For Other Cost (If Any) :
This form includes the budget of extra identified/unidentified things which may be needed in the project. When you click on Next button of "Budget for Contingency", the following page as shown in Figure 3.25.
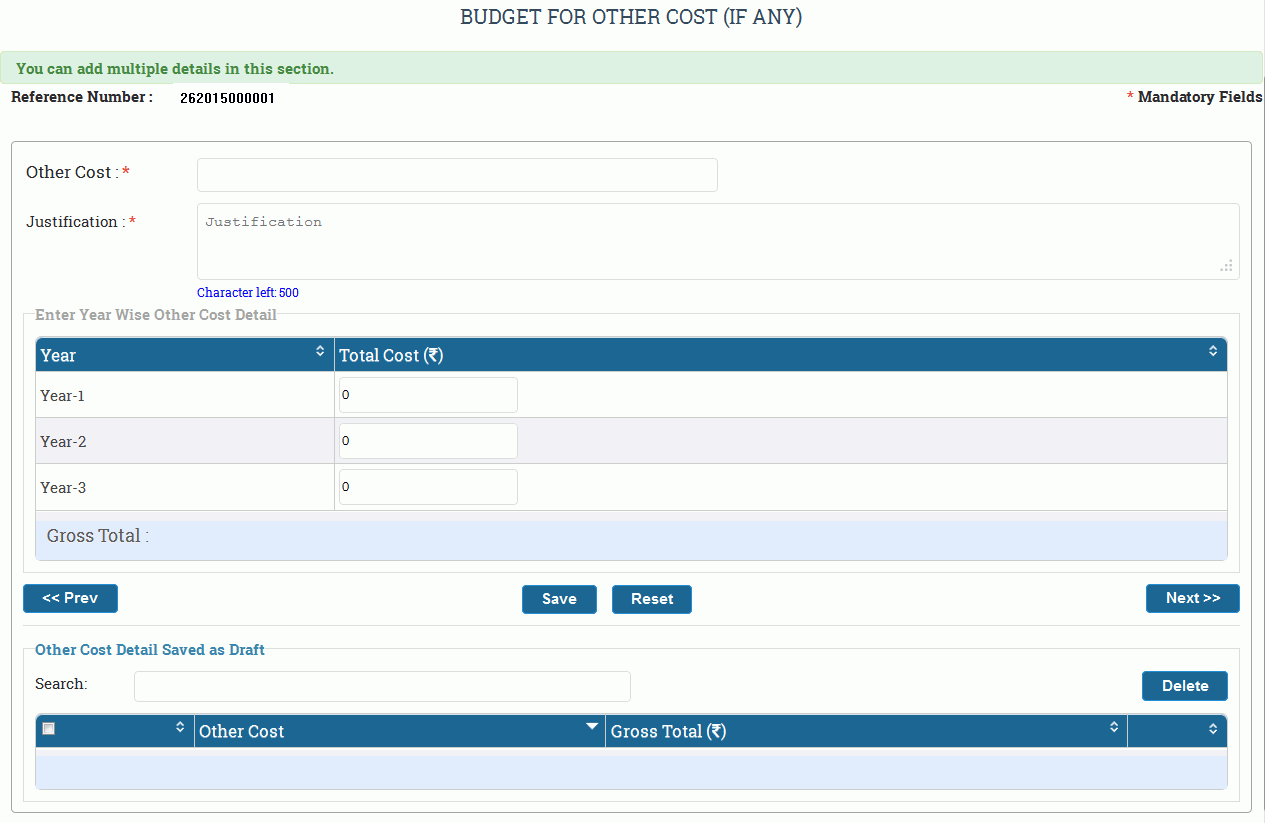
Figure 3.25
Fill in the details asked for in the form "for other cost" for the consecutive years of research respectively. The page will appear as shown in Figure 3.26, click on Save button to add it to the table.
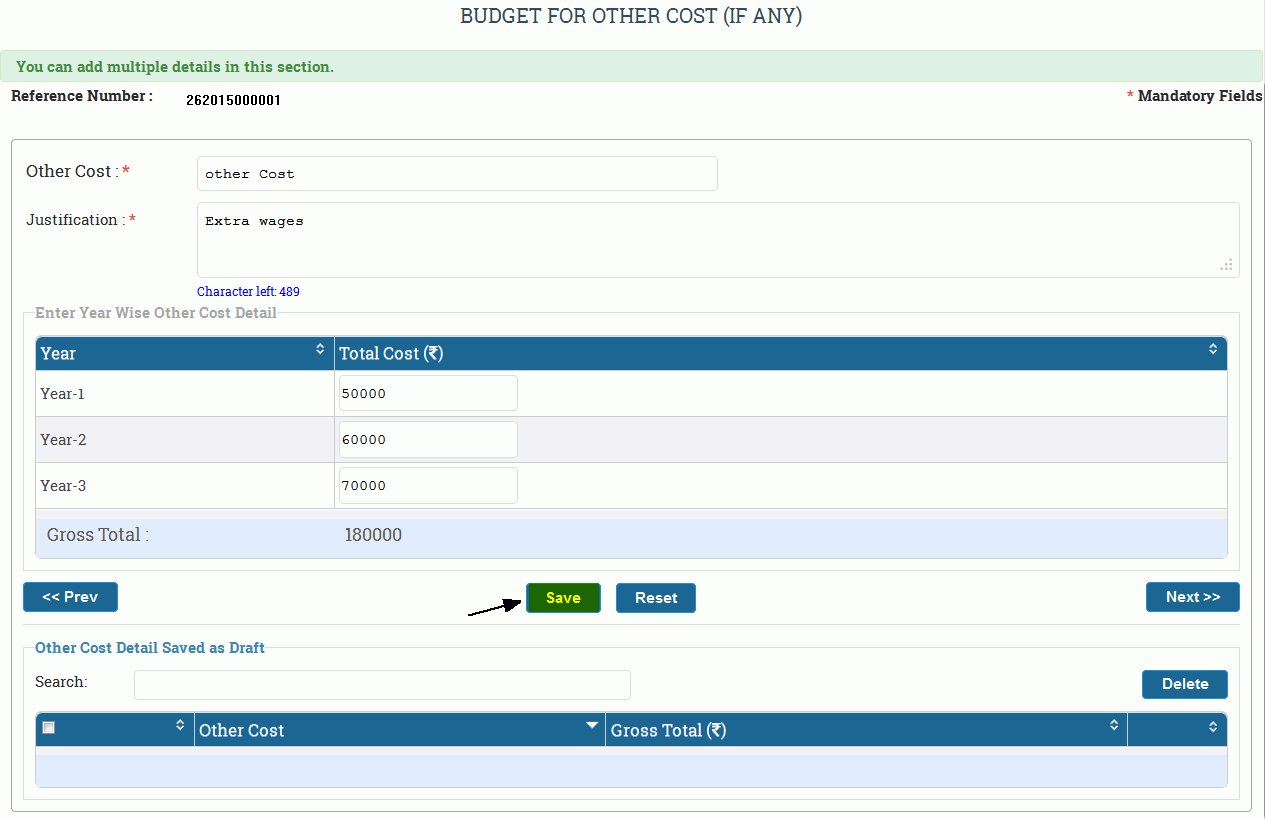
Figure 3.26
Save,edit and delete the details as explained before as needed. Click on Next button (highlighted) to go to next page,as shown in Figure 3.27.
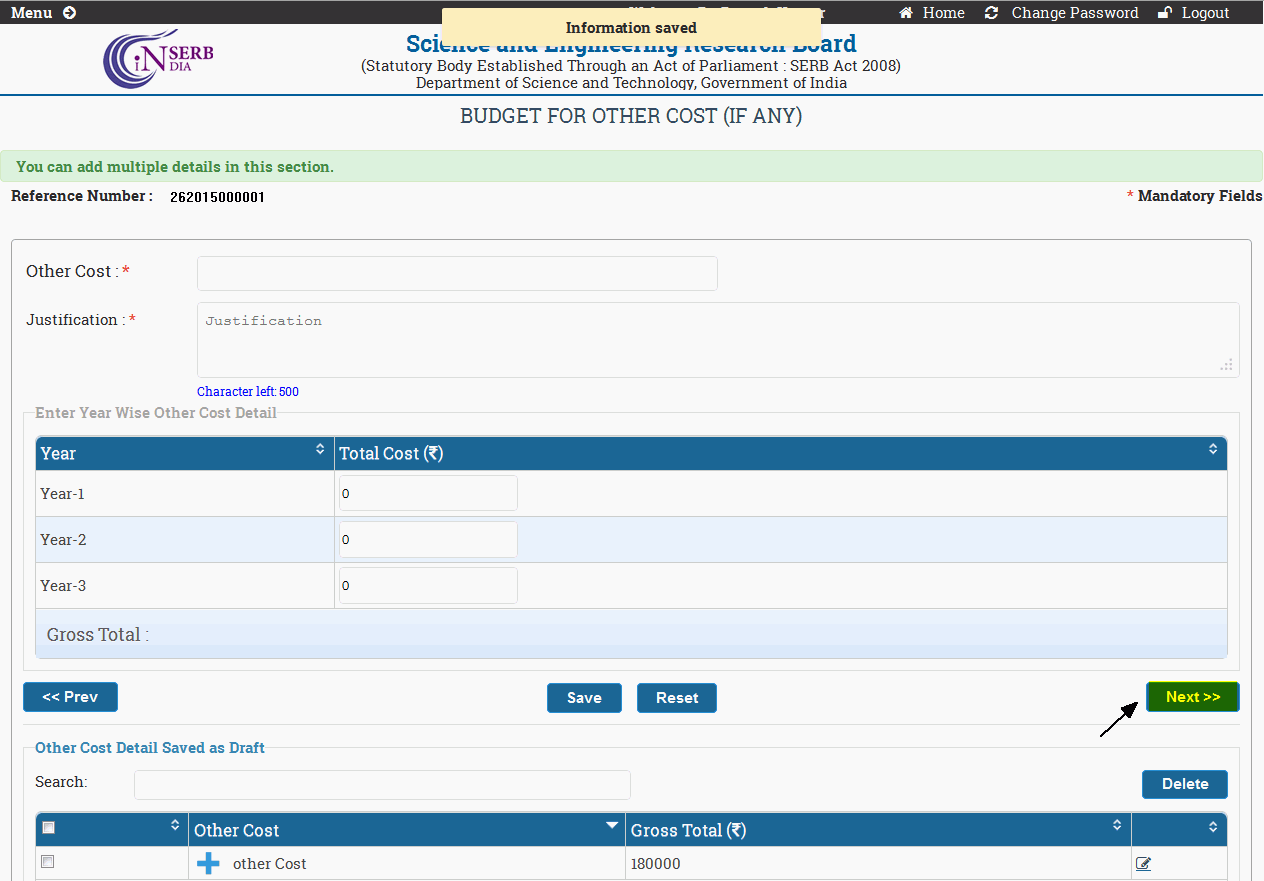
Figure 3.27
Budget For Overhead:
This page will appear on click of Next in "Budget for Contingency". You need to fill in the budget for overhead expenses. The page will appear as shown in Figure 3.28.
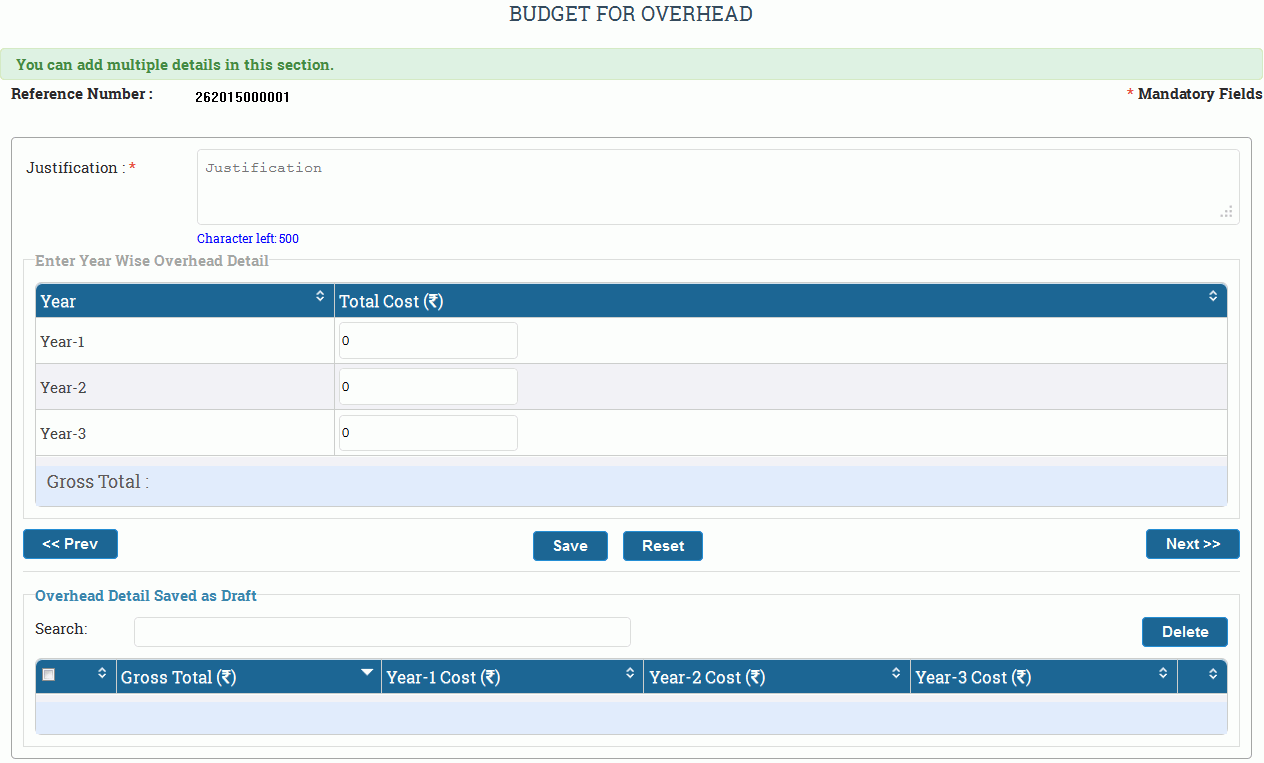
Figure 3.28
Fill in the details as asked in the form to provide the overhead budget and click on Save button (highlighted) to add it to your table, as shown in Figure 3.29.
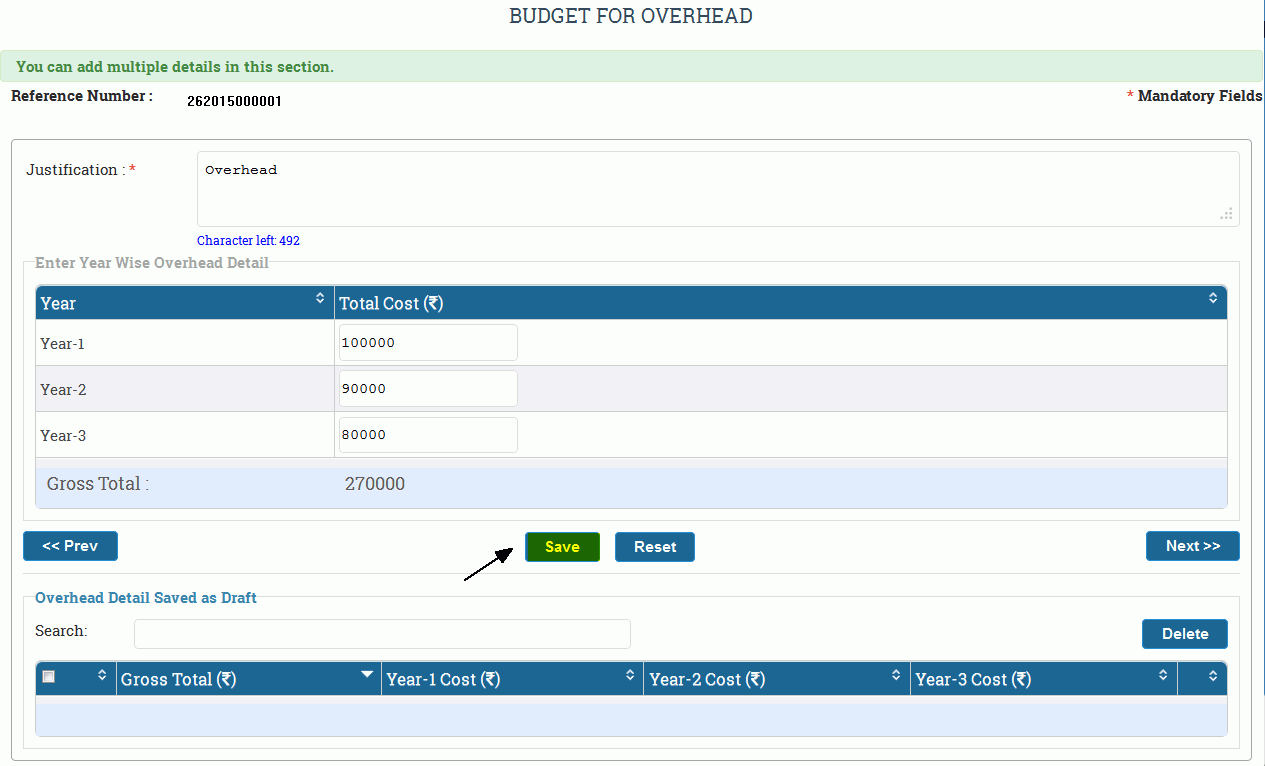
Figure 3.29
You can see the details in the table as shown in Figure 3.30. Save, edit and delete the details as per your requirement , as explained before. Click on Next button to go to next page.
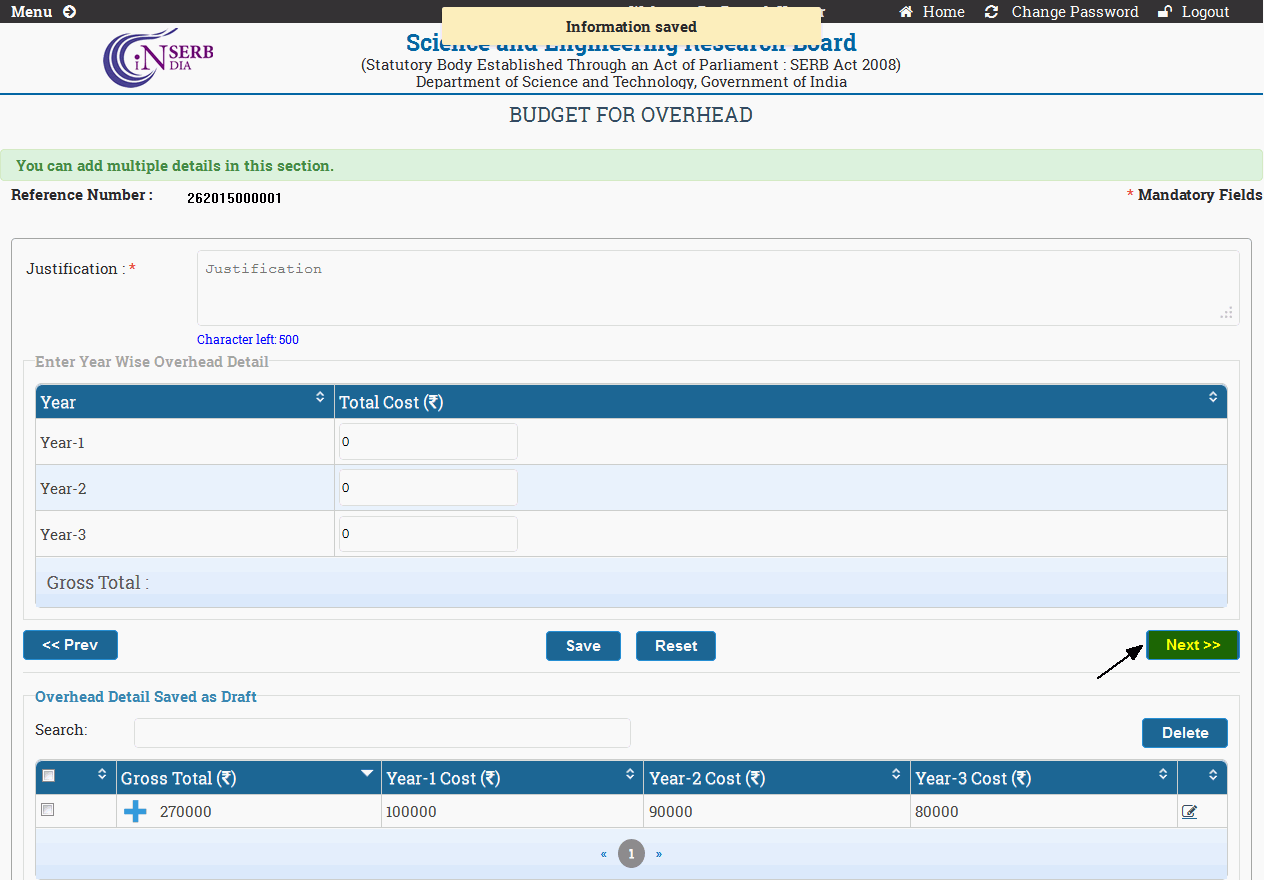
Figure 3.30
Budget Summary :
You can see the Budget summary of different proposals. The values which are underlined are hyperlinks of your current Budget details respectively. You can see the budget details on clicking the respective budget hyper-links. Figure 3.31 will lead to two different pages:
-
View Full Proposal : This will lead to the Full Proposal View containing all the details of proposal at a place.
-
Next : This will lead to next page for submitting different documents required for proposal.

Figure 3.31
Upload Form :
The upload form will open on click of Next button of "Budget Summary". You have to upload all the listed document for submission of proposal. In case you do not have all the documents, edit it later while viewing full proposal. If all the documents are not submitted then the proposal will not be submitted. The page appears as shown in Figure 3.32.

Figure 3.32
Select the name of the document from the drop down list of documents and upload file,as shown in Figure 3.3. The numbered features are as follows:
-
Download Template : This helps you to download the template of the selected document, the format in which the document has to be submitted. Click on the text and download will start automatically.
-
Document Name link : As soon as selected document is uploaded it is populated in the table. You can download the document by clicking on the Document name link.
-
Remove : You can remove the document if uploaded wrong.
-
Add : You can select the document from the document name drop down and can upload it. As soon as upload is complete it will automatically populate in the table. In this way you can add all necessary documents one by one..
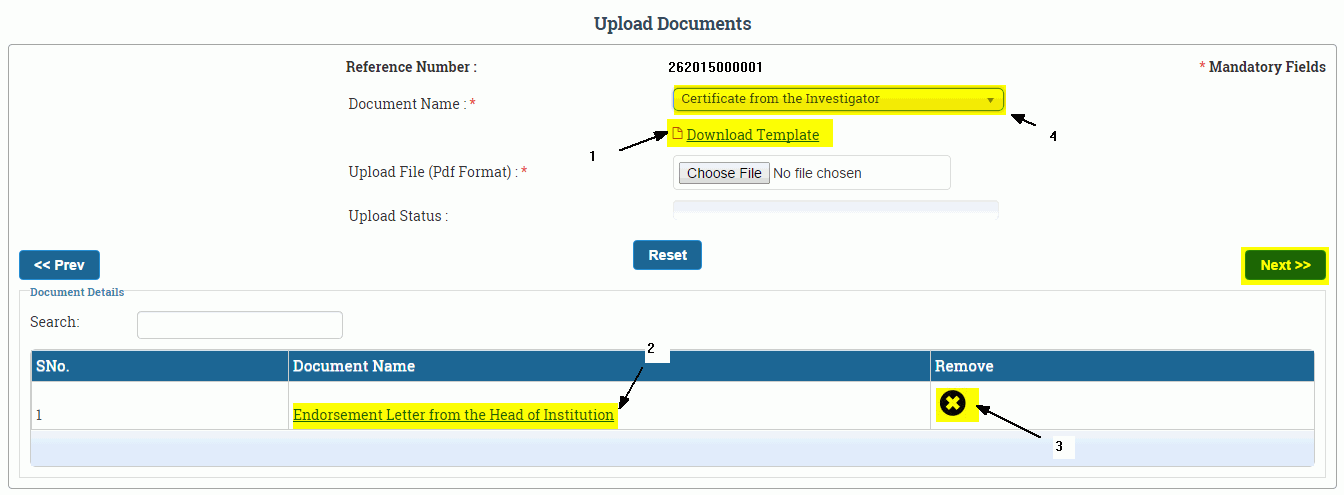
Figure 3.33
Other Information :
The Next button from "Upload Form" will lead to "Other Information" form. You can fill any other relevant information you want to provide for the proposed research to be known to the approving authority. Apart from other relevant information you can also select the Government National Program under which your research can be beneficial ,as shown in Figure 3.34.
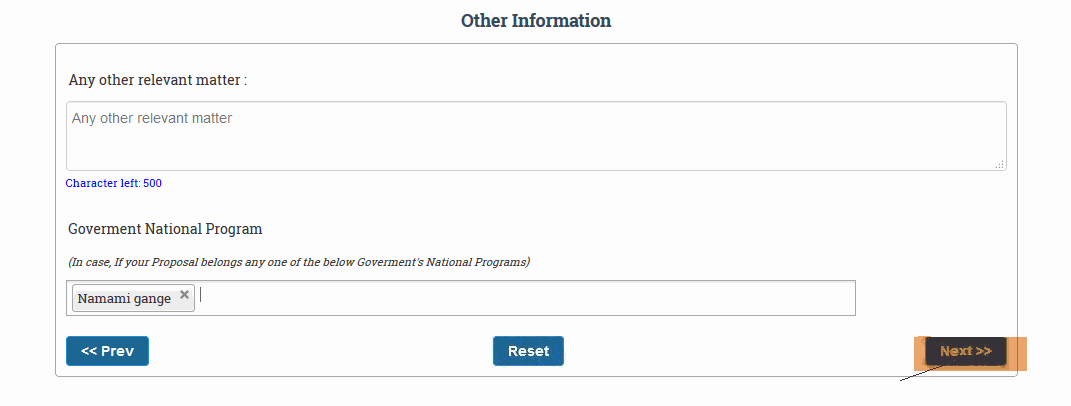
Figure 3.34
After filling the information the form will be as shown in Figure 3.35

Figure 3.35
After saving, click on the Preview & Submit Proposal to submit the proposal. The page will appear as shown in Figure 3.36.
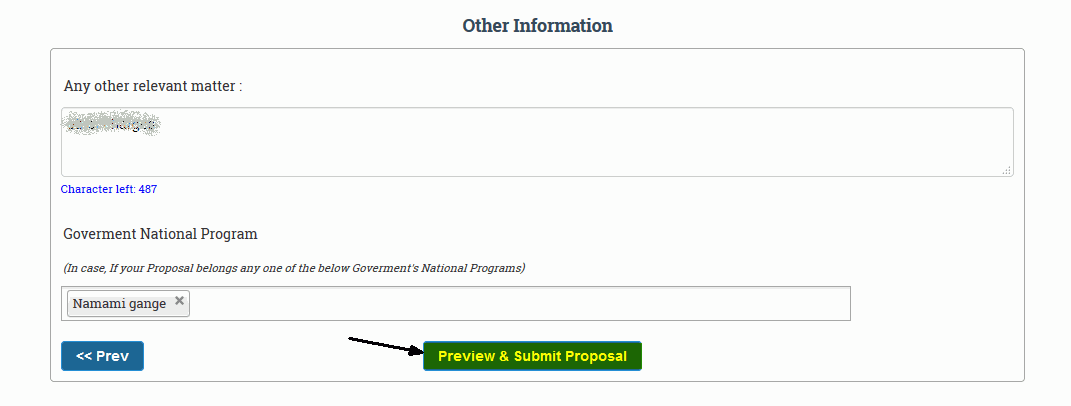
Figure 3.36
After click on the Preview & Submit Proposal , the next screen will be final submission of the proposal.. The page will appear as shown in Figure 3.37.
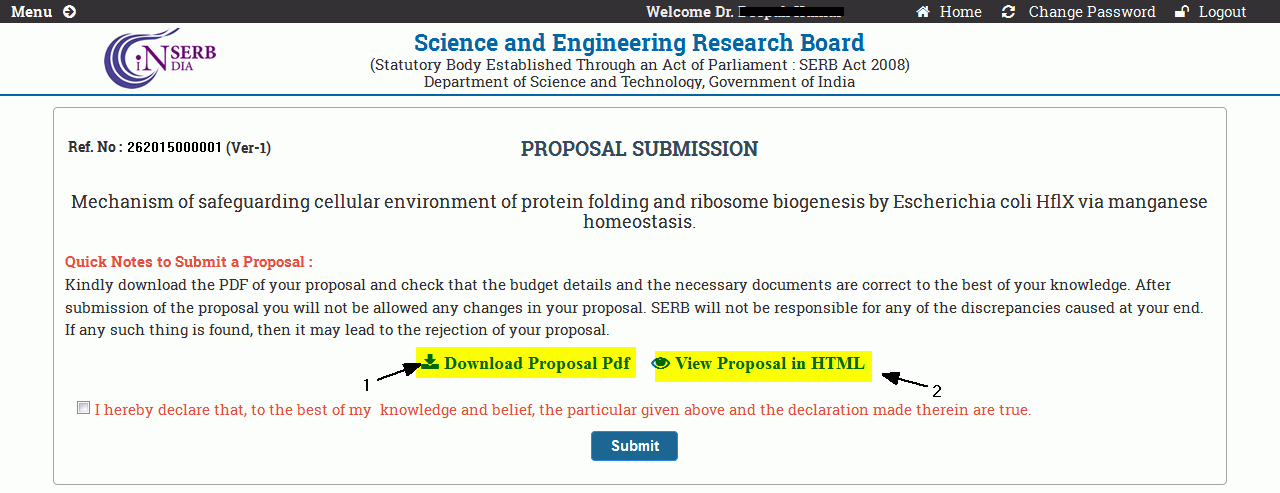
Figure 3.37
You can see your proposal by two different options, as shown in Figure 3.38.
- Download Proposal PDF :This will download the pdf of whole proposal containing different details and the documents submitted.
- View Proposal in HTML :This will open a pop-up window containing full proposal with different budget details and documents.
Check the declaration and click on Submit button, as shown in Figure 3.38.
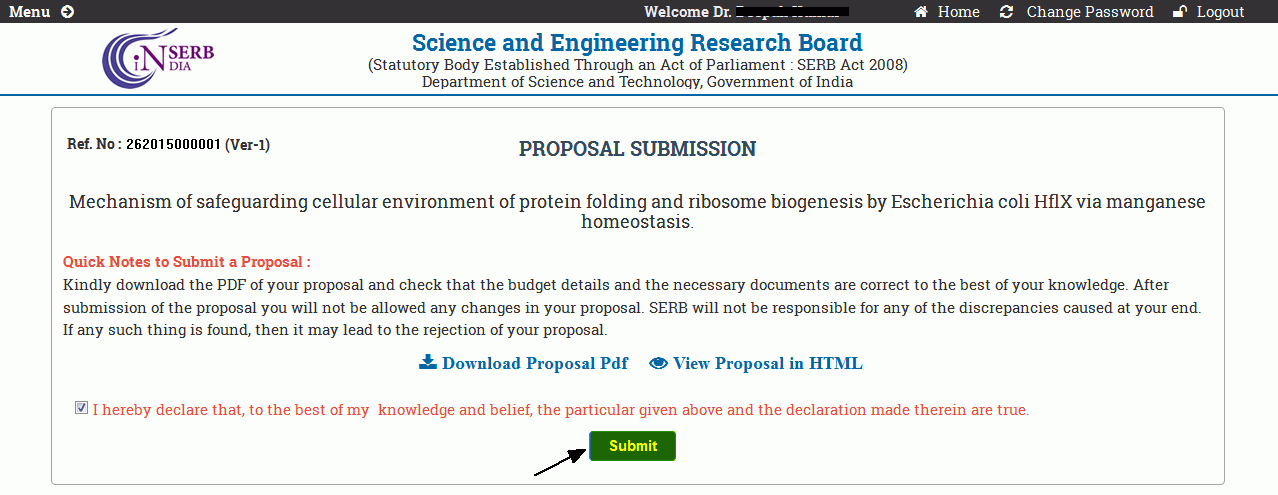
Figure 3.38
After submitting, the page will ask for confirmation of form submission, as shown in Figure 3.39.

Figure 3.39
Click on OK, and a pop-up message will display that your proposal is successfully submitted, as shown in Figure 3.40.
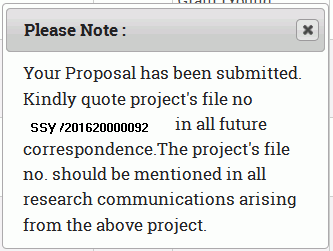
Figure 3.340
Saved Proposals :
Click on the Menu and select the Saved Proposal from the Proposal Submission to see the different proposals you have filled and saved but not submitted, as shown in Figure 3.41.

Figure 3.41
The page will appear as shown in Figure 3.42.
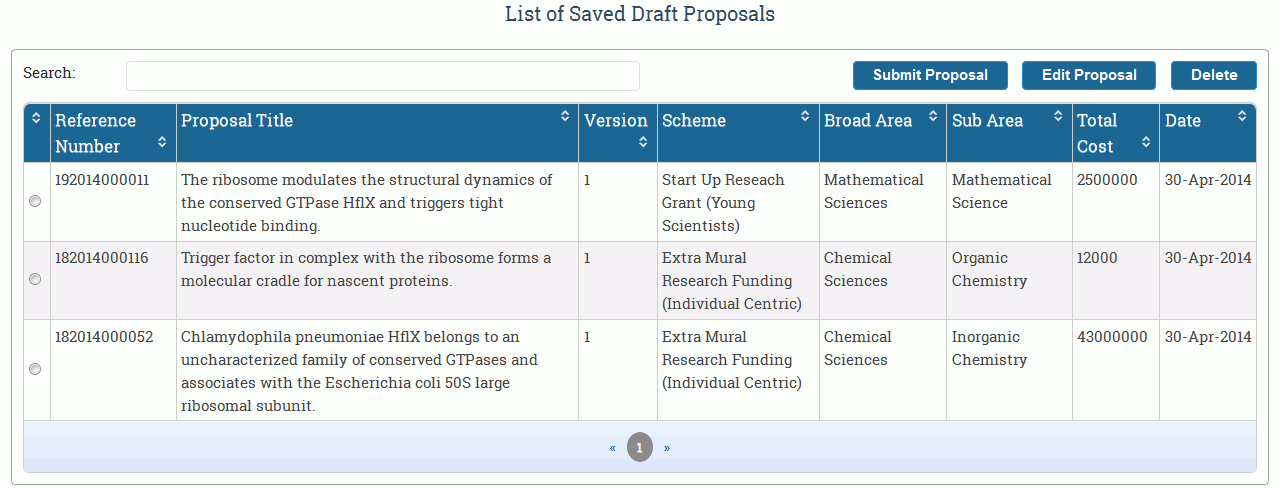
Figure 3.42
Select a proposal as shown in Figure 3.43. The numbered features are:
-
Submit Proposal :This will lead to submit proposal form.
-
Edit Proposal :This will open full proposal and you can edit different details from there.
-
Delete :This will delete the Proposal.
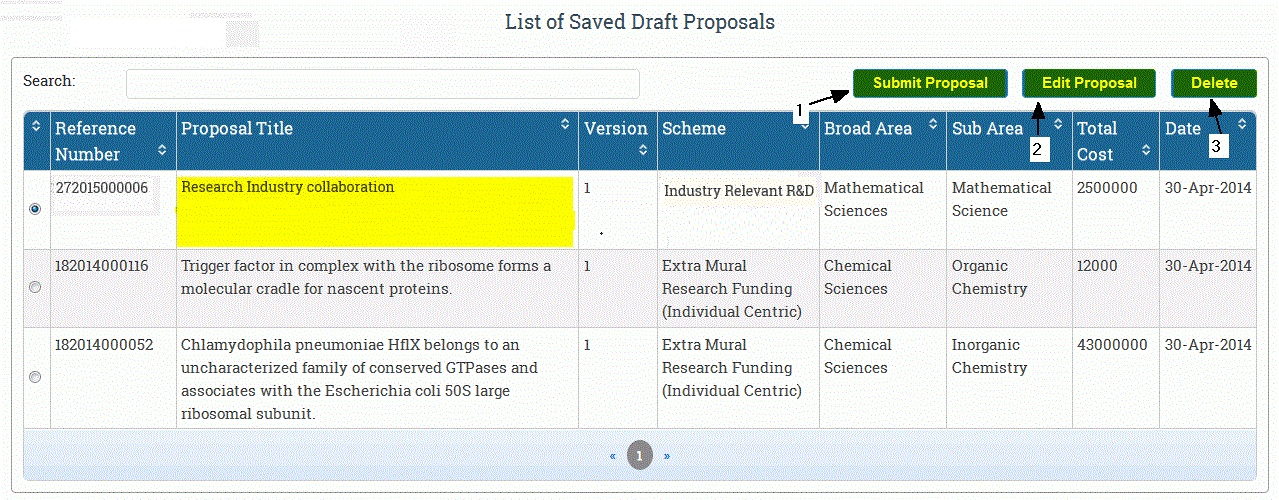
Figure 3.43
Submit Proposal :
Select the proposal to be submitted and click on the Submit Proposal button, as shown in Figure 3.44.
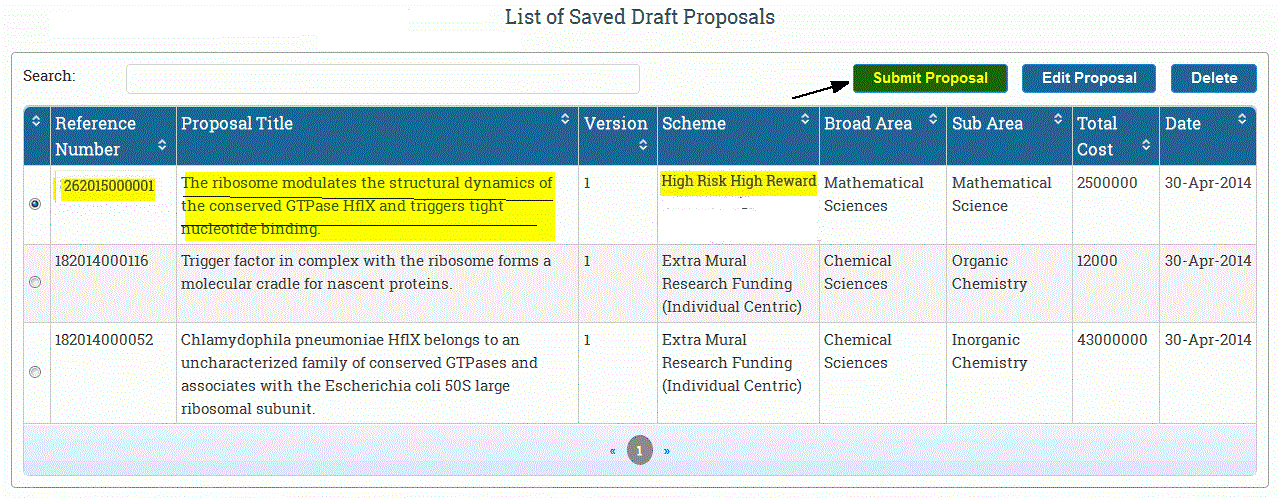
Figure 3.44
After selecting Submit Proposal, the page will appear as shown in Figure 3.45. Click on the checkbox and then on Submit button.

Figure 3.45
After submitting it will confirm for submission of proposal, as shown in Figure 3.46.

Figure 3.46
The pop-up message will display that your proposal has been submitted, as shown in the Figure 3.47.
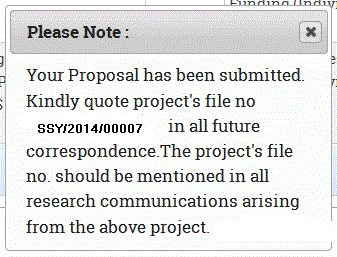
Figure 3.47
Edit proposal :
Select the proposal to be Edited and click on the Edit Proposal button, as shown in Figure 3.48.
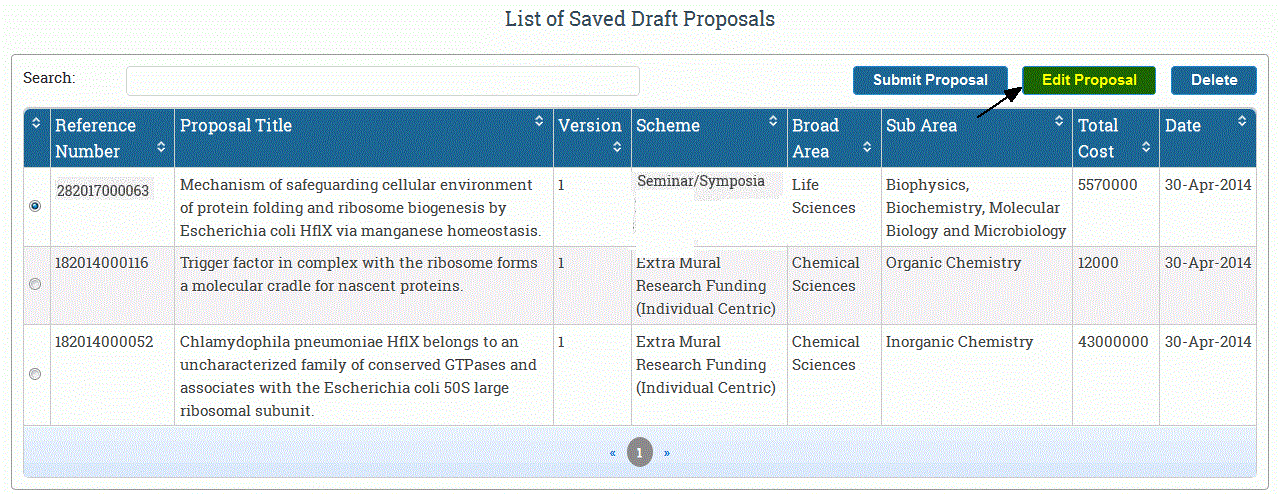
Figure 3.48
After selecting Edit Proposal button the page will appear,as shown in Figure 3.49. Different Edit buttons are displayed with respect to different details ,you can edit them by selecting the proper Edit button. After Editing select Review & Submit Proposal to submit proposal.


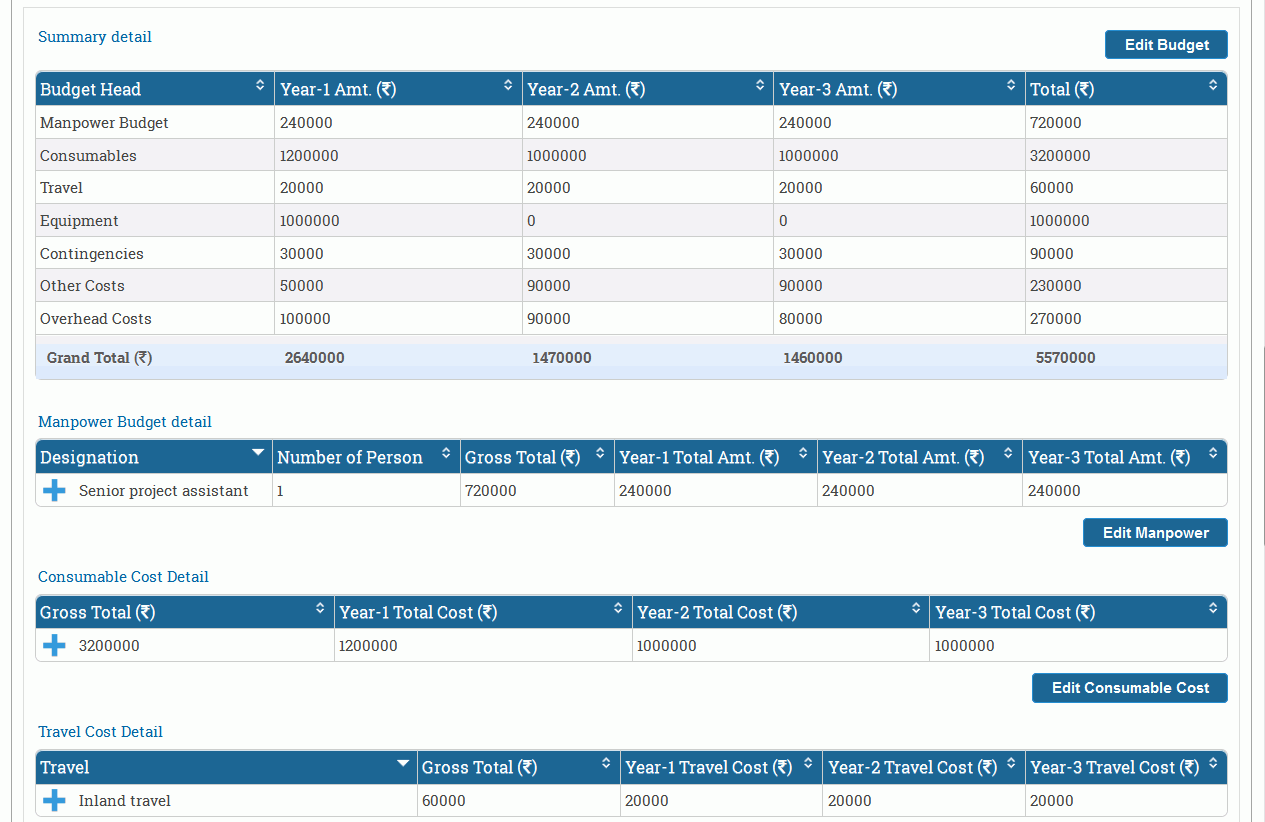
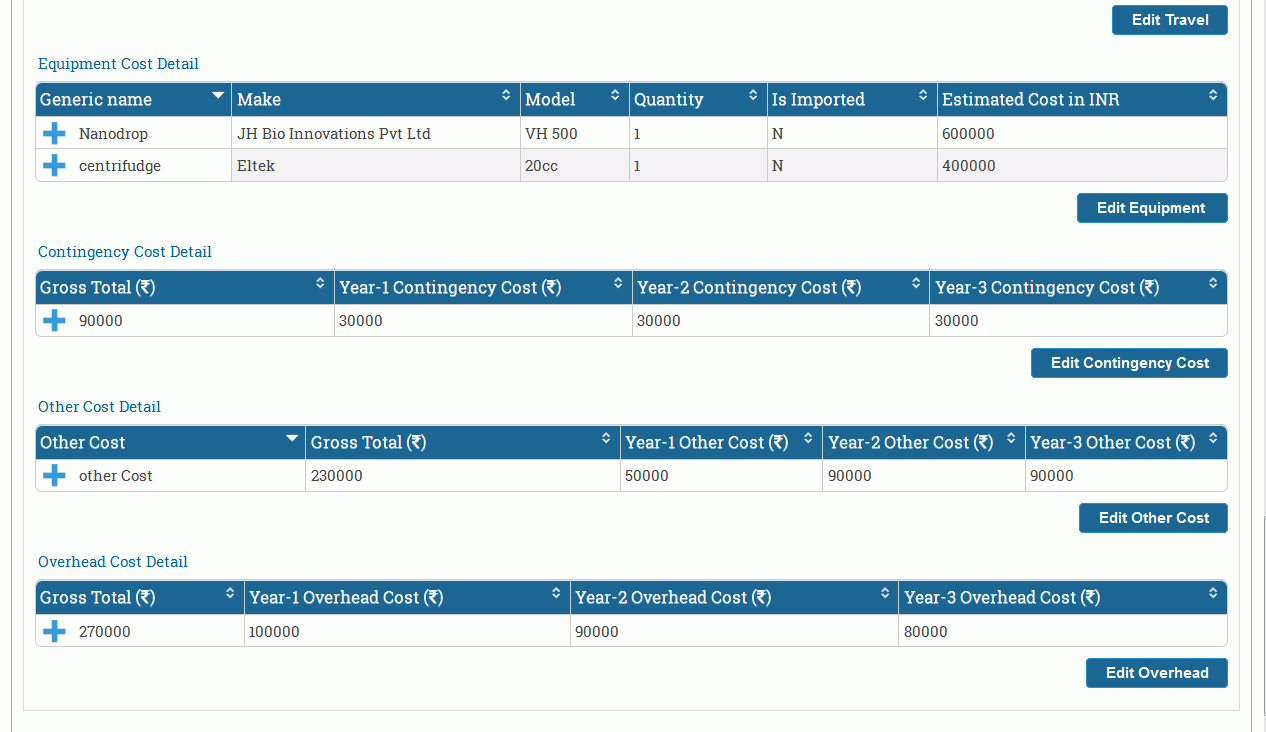

Figure 3.49
After selecting Review & Submit Proposal, the page will appear as shown in Figure 3.50. Click on the checkbox and then Submit button.

Figure 3.50
After submitting, the page will ask for confirmation of form submission, as shown in Figure 3.51.

Figure 3.51.
The pop-up message will display that your proposal has been submitted, as shown in the Figure 3.52.
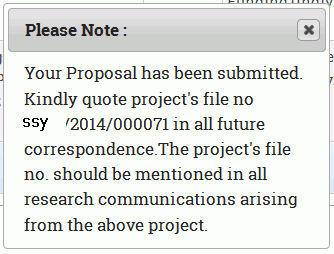
Figure 3.52
Delete Proposal :
Select the proposal to be deleted and click on the Delete button, as shown in Figure 3.53.

Figure 3.53
After clicking on Delete, the page will ask for confirmation, as shown in Figure 3.54.
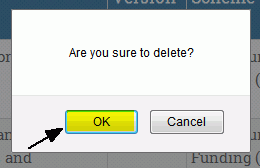
Figure 3.54
The pop-up message will display that your proposal has been deleted, as shown in the Figure 3.55.
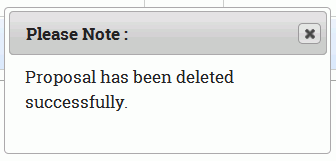
Figure 3.55
View Submitted Proposal
Click on the Menu and select the View Submitted Proposal from the Proposal Submission to see the different proposals you have filled and submitted with their current status, as shown in Figure 3.56.
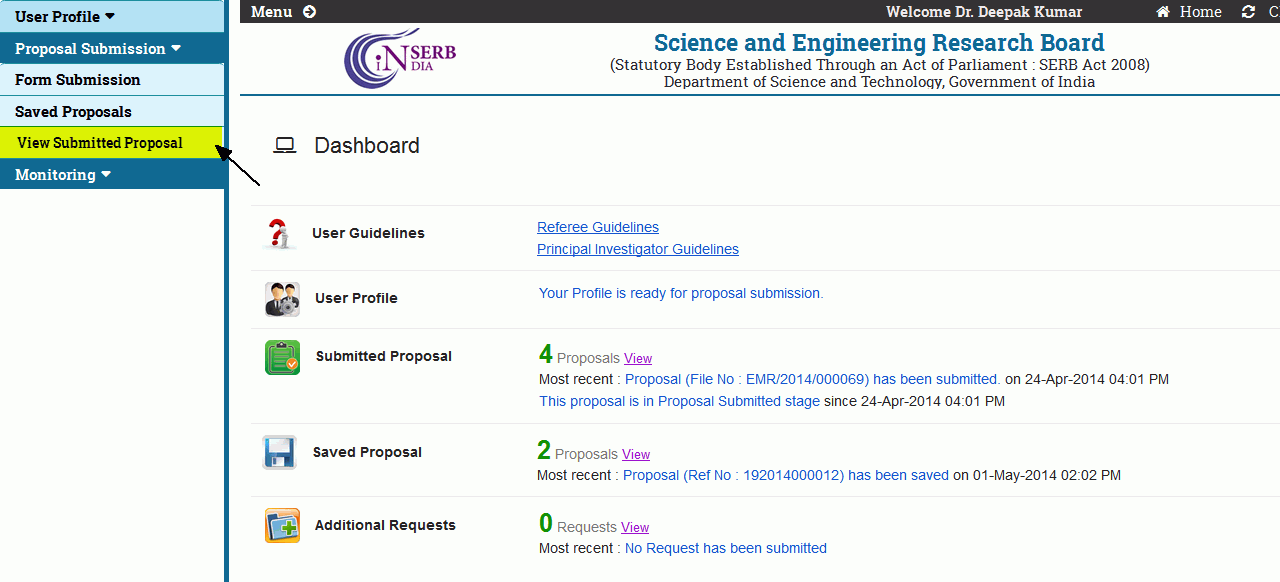
Figure 3.56
After selecting it the page will appear,as shown in Figure 3.57. The numbered features are:
-
Radio Button : This is used to select a particular proposal.
-
Proposal Name : This is a hyperlink which on click will display full proposal.
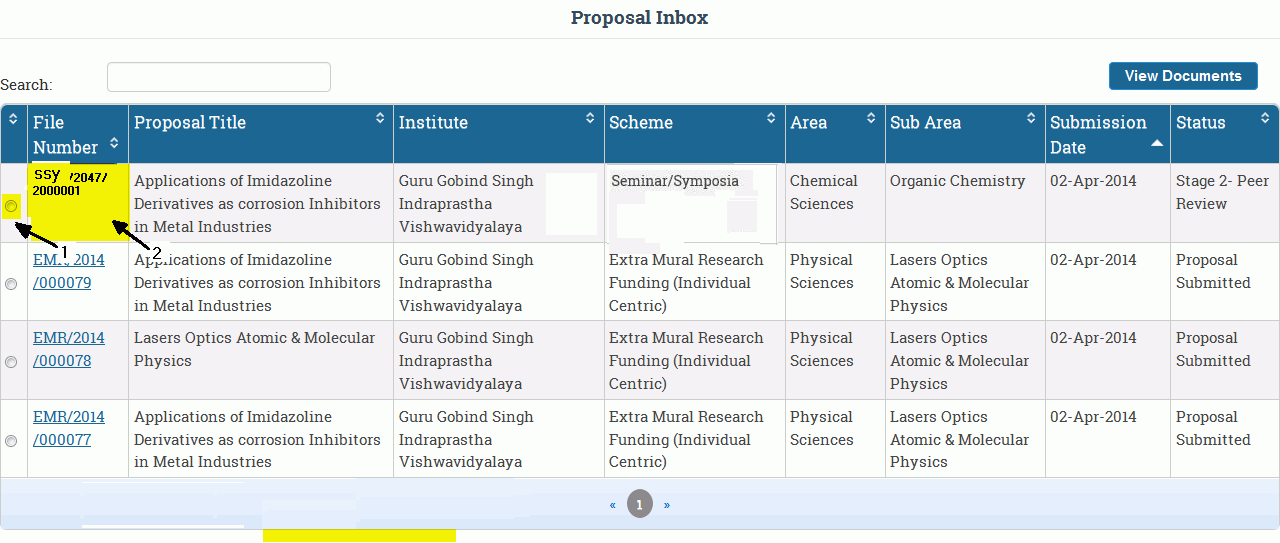
Figure 3.57
Select a proposal as shown in Figure 3.58. Click on the View Document button to display the list of documents submitted.
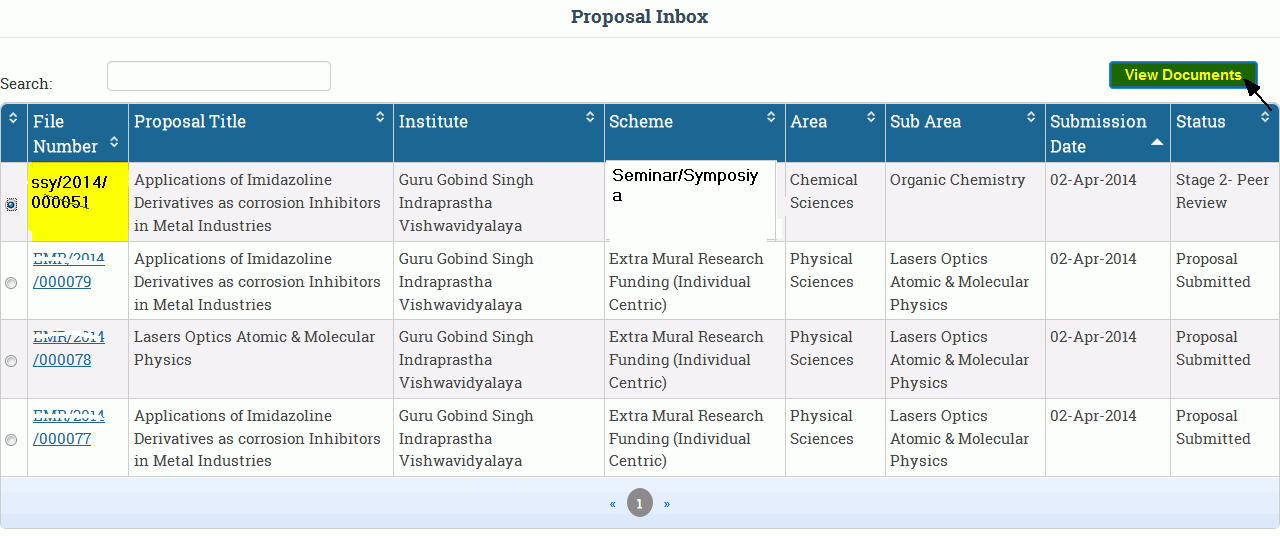
Figure 3.58
After selecting View Document button, a pop-up window will open containing the list of documents with their respective status for the selected proposal. The "right" mark shows that document is submitted and "cross" mark shows that document is not submitted, as shown in Figure 3.59.
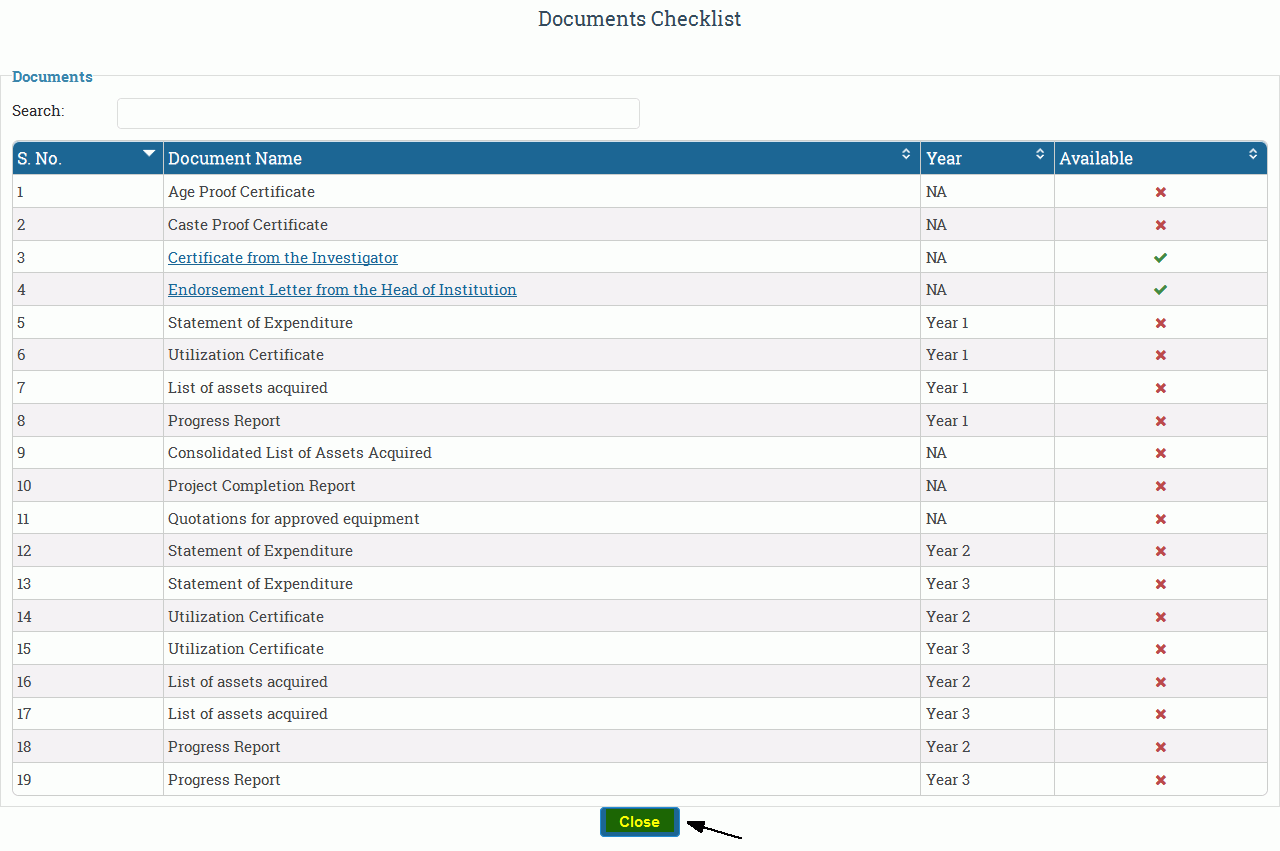
Figure 3.59

